Target
The first step in using Laudanum is to have a target server to deploy to. When doing a legal penetration test or security assessment, you may be given a list of servers that are in scope. If not, make sure that you have identified a server that is in scope for your contract. Please do not do this on systems that you do not have ownership and permission as it would be illegal and you may get in a lot of trouble (don’t say I didn’t warn you).
In this example, I have identified a Ubuntu server that is running a java based web server. Since the server allows running JSP pages, I will chose to use the JSP files included with Laudanum. At this time, there is only a cmd.jsp file in the JSP folder. This file allows running commands against the target server.
Deployment
In order to deploy the cmd.jsp file to the server, I have to identify a vulnerability that allows uploading a file. In this case, I have identified that the server is running Tomcat. This would not normally be vulnerability, but….. it just so happens that when I installed Tomcat I used easily guessable credentials, that I can use to access the management interface. By default, the Tomcat installer did not have any users with the permissions to access the manager interface. I had to purposely make this vulnerable. I know that may sound unlikely, but trust me, it is not. Tools like Nessus are great at identifying these default/weak credentials too. Lets assume I used Nessus to find this vulnerability (even though I built this machine just for the purpose of this post).
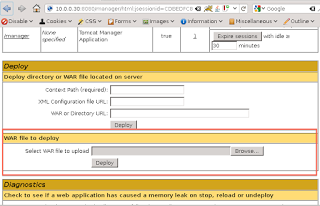
The Tomcat manager UI has a cool little feature that allows deploying .war files to the server. The following image shows where Tomcat allows deploying local files to the server.
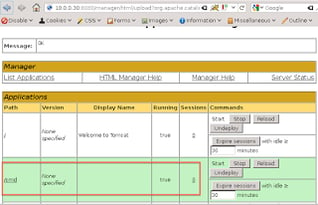
Lucky me, Laudanum already provides a war file for the shell cmd.jsp file. By selecting the cmd.war file and clicking the “Deploy” button, I can now see that my package has been deployed.
Execution
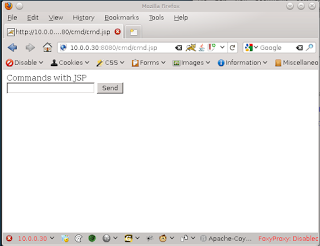
Now that my file has been deployed, it is time to access it. Keep in mind, that our package doesn’t have a default page, so just navigating to the /cmd directory will not provide us anything unless directory browsing is enabled. All too often I see people attempt to just visit that directory and they get an error and think that the deploy did not work. Make sure that you go to the /cmd/cmd.jsp file directly. If you are successful, you should see a screen like below:
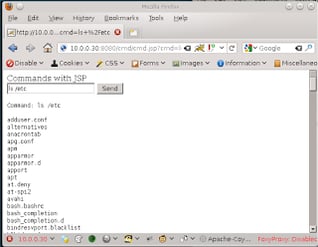
As you can see, it is pretty simple. There is a single input box where you type your shell commands and a button to execute them. This can be rather tricky because some commands you expect to work may throw errors. Don’t let that discourage you. Keep trying different commands until you find what you are looking for. In the next example, I will run the ‘ls’ command to display the contents of a directory.
As you can see, the contents are written out to the page. If you run a command and you don’t see any results, but there was no error thrown either, view the source of the page. Some items may not display fully rendered but may actually be in the source. This is common if the output may be xml files or something that would be rendered invisible.
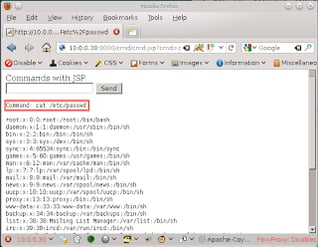
Another command we can execute is the ‘cat’ command to look at the contents of some files. The image below shows viewing the /etc/passwd file. Fortunately, shadow files are used, so no passwords are revealed here, but we can see how easy it is to view data. Imagine if we found website configuration files, ssh keys, certificates (the private keys), etc. There is a lot that can be pulled just by viewing files. We will see this as well when I do the next post discussing the file browser capabilities.
Of course, there are many other things we can do.. don’t let your imagination let you down. For example, adding users, or making changes to the system. I have used this technique I just walked through to fully compromise a server by adding my own users, elevating their privileges to an administrator level and then logging directly into the system through RDP. All of this, from a simple password and a script we uploaded.
Conclusion
So as you can see, it is very easy to set up Laudanum to upload a shell utility to a server. The hardest part is identifying the vulnerability that you can use to upload the actual utility. Once it is available and you can access the file, there are many things you can do to gain information and compromise the system. In this example, we took advantage of a functionality that is supposed to be there, but unfortunately, was not properly protected with a strong password or disabled if not needed. In other cases, we may have found a file upload function that allowed dumping files in the webroot, or a sql injection that allowed writing files to the web root. All great examples of why defense in depth is very important in addition to properly securing the functionality.
James Jardine is a Principal Security Consultant with Secure Ideas.
If you are in need of a penetration test or other security consulting services you can contact him at james@secureideas.com or visit the Secure Ideas – Professionally Evil site for services provided.

