I decided to setup a fake access point (AP) using a matching SSID, which we will call “FOOBAR” for our purposes. I downloaded the latest version of hostapd (2.0 as of this post) and set it up to be use WPA2 Enterprise and configured Freeradius-WPE as the fake authentication system. The goal was to have a client connect to my evil AP and then give me their credentials.
Freeradius-WPE came pre-installed on my laptop running Backtrack, so no real work there. About all I did was install a valid SSL certificate for use by the radius daemon. Unfortunately, I could never get Freeradius-WPE to handle the CA certificate chain correctly and that had an impact on my attack later on. If you don’t care about a valid TLS certificate, then start Freeradius-WPE on Backtrack by running “radius -X“. The -X will cause the daemon to setup self signed TLS certificates automatically.
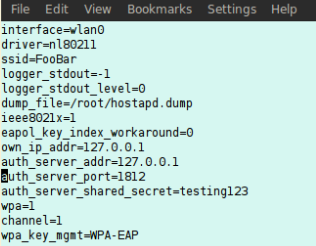
With that done, I moved on to installing hostapd. At first I installed hostapd from the apt repositories already setup in Backtrack. Unfortunately, there was an issue with that version and my setup, which caused it to fail at startup. To get around this, I downloaded and installed the app from source and the problem went away. Below is my hostapd.conf file.
This config is largely based off of some searches for default configurations of hostapd and then I researched the settings that I needed to have to get WPA2 Enterprise working. The critical pieces to doing that were setting wpa=1 and then setting wpa_key_mgmt=WPA-EAP. I also made sure that hostapd was pointed to my radius server and had the correct password to access it. Last, I set my SSID to match our client’s environment (or in in this example used “FooBar”). To get hostapd running, I ran “hostapd hostapd.conf” and I was up and running.
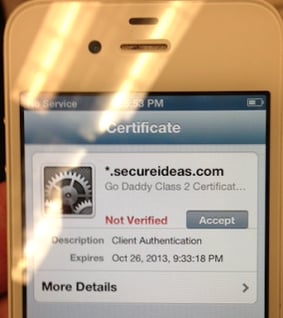
I picked up my test iPhone and found FooBar in my list of available networks. When I selected this network, I was prompted for my test account’s username and password. So far so good… Then I hit a major snag in making this attack invisible. The SSL certificate chain was not being presented properly, so my cert showed up as invalid.
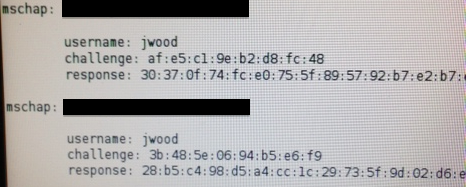
After a bit of troubleshooting and a dwindling testing window for this attack, I finally had to relegate fixing this to later research. And honestly, if someone was presented with an invalid certificate the chances are pretty high I’d get someone to click on it in spite of this warning. I accepted this warning and proceeded on with my test. The credentials were sent to my fake AP and Freeradius-WPE captured my credentials.
The password doesn’t get sent across, but that’s hardly an issue in this case. I’m using a really dumb password for our example and John the Ripper with a good password list will have no issues with it. All we need to do is take the username and hashes and put them into a text file in the format that john expects for NETNTLM hashes. This involves removing all the colons in the hashes and getting them delimited properly for the expected format. My two entries end up looking like this in my capture file.
Finally, I turn John loose on the hashes by running “ john -w:/pentest/passwords/wordlists/rockyou.txt –format=NETNTLM hashes.txt“. As expected, the hashes broke within seconds.
At this point the attacker wins by using these credentials to log into the targeted network and proceeds with whatever the next step in their attack is. There were a few steps to get to this point, but really it was pretty straight forward.
Happy pentesting!
Jason Wood is a Senior Security Consultant with Secure Ideas. If you are in need of a penetration test or other security consulting services you can contact him at jason@secureideas.com or visit the Secure Ideas – Professionally Evil site for services provided.


