Today I wanted to continue the series on using LD_PRELOAD. In today’s post we are going to use LD_PRELOAD to hijack the rand() function in a simple random number guessing game to control the generation of random numbers and effectively be able to cheat in this simple game by making it extremely predictable. The code for both the game, as well as the LD_PRELOAD shared object to hijack it have been uploaded to the Professionally Evil GitHub page. The example was built to run in a Kali VM if you’d like to follow along as you read.
Cloning the GitHub Repository
In a Kali VM, open up a terminal and run the following command to download the example code:
| git clone https://github.com/ProfessionallyEvil/LD_PRELOAD-rand-Hijack-Example.git && \ cd LD_PRELOAD-rand-Hijack-Example && \ ls -l |
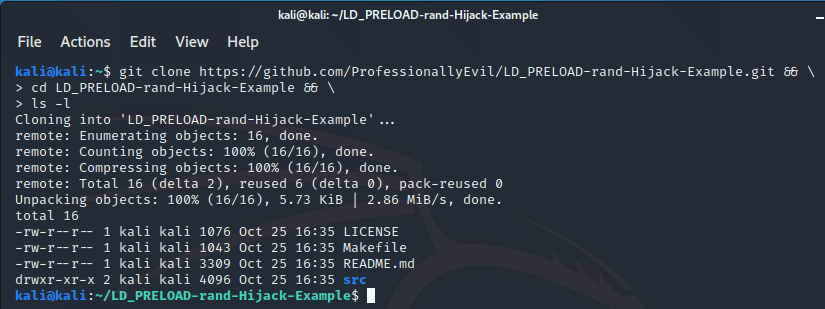
This will download the repository (repo) to whatever directory you are currently in and will change to the directory it created and list its contents. Assuming everything went correctly, you should see output like the following:
Overview of the Files Downloaded
The repo for this example is pretty straightforward, however I still wanted to take a moment to explain the file structure to the repo so we’re all on the same page.
- ./LICENSE: This is a file with the LICENSE for the repo. It is licensed with the MIT license.
- ./Makefile: This is the make file. It has build targets that explain to the make command how to build the project. This will be covered in more detail in a later section.
- ./README.md: The standard readme file for the Github repo.
- ./src/: The directory that contains the source code files for the game and shared object.
- ./src/guessing_game.c: The source code for the random number guessing game that will serve as our target binary to use LD_PRELOAD against.
- ./src/rand_hijack.c: The source code for the hijack shared object that we will use to hijack the rand() function with.
Reviewing the Code for the Guessing Game
The code for the random number guessing game is under the ./src/ source directory in a file called guessing_game.c. Generally, it’s recommended that you review code you download before using it. You may use whatever editor you’d like to open it and review it. The code is fairly well commented. The high level overview of the game’s logic is as follows:
- Initialize Variables
- Print a banner
- Have the user guess a random number between 0 and 31337
- Use printf() to print the prompt
- Use scanf() to read in a unsigned int from stdin
- Attempt to make sure the input was good or abort the game
- Seed the random number generator with srand() using the current time
- Get a random number between 0 and 31337
- OPTIONAL STEP: Print the variables user’s guess and random number if the game build was a debug build
- Compare the random number against the user’s guess:
- If they match, let the user know they won
- If not, let the user know they lost
On an error or wrong guess, the game will exit with a return value of 1. If the user guessed the number correctly, the game will return a 0.
Using Make with the Supplied Makefile
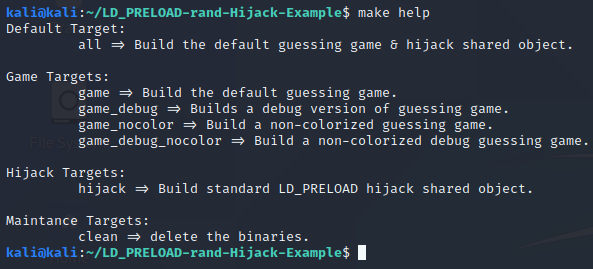
Back in the parent directory of the repo, there is a Makefile. This file will be used anytime you call the make command. Calling make without any arguments will invoke the default build target which is all to build the game and hijack shared object binaries in the root of the repo directory with the defaults. There is also a help target that can be invoked to show you all of the build targets you can use with make. The game can be built as a debug build, without color support, or both as optional builds. Below is a screenshot of the make help output:
Building and Playing the Game
To get started, let’s build a default version of the random number guessing game using the following make command:
| make game |
That command should create the binary for the game in the root of the repo directory as ./guessing_game. The output from that make command and a follow-up ls -l should show the following output:

Now that we have the game binary, let’s play it a few times to get a feel for it. To launch the game, use the following command:
| ./guessing_game |
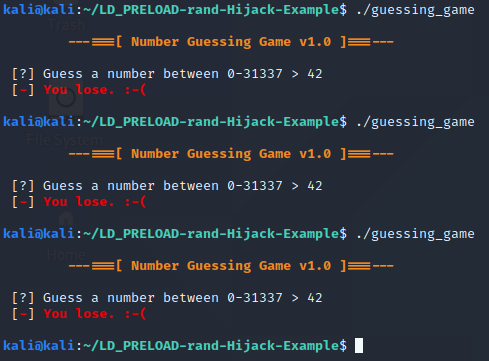
Below was how my game sessions went, I’m batting 0-3 with the game in its default build mode.
Now let’s try building a debug version of the game to see just how random the values are.
Building and Playing the Game with Debugging
Now that we’ve played the game and gotten a feel for it, we will use make to build a debug version of the game. The debug version of the game will leave the ELF unstripped of debug symbols and add a few printf() statements that will dump the user’s guess and the random number that was generated out to the console. This will allow us to see how random the numbers actually are. To build the debug version, use the following make command:
| make game_debug |
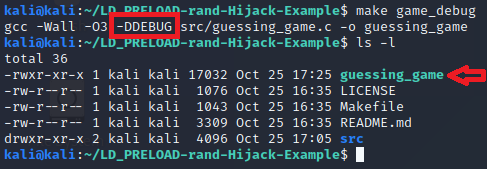
This will replace the original ./guessing_game binary with a new debug version of it. The screenshot below shows the output of this command, highlighting the -DDEBUG flag in the gcc command, and showing the follow-up ls -l command, showing the binary is now ~2-3kb larger due to the symbols and extra code.
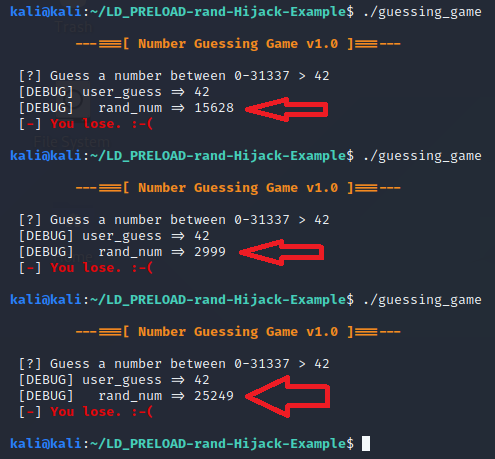
Now if we try to play the game a few times like last time, we will likely still not guess it right, but at least it shows us what the random number was as shown in the screenshot below:
Reviewing the Hijack Shared Object Code
Now that we can see the random numbers have a pretty large range, we are going to deploy LD_PRELOAD to cheat in this game by controlling the generation of random numbers. First however I would recommend looking at the man page for ld.so by running the following command:
| man ld.so |
Once the man page comes up, review the section on LD_PRELOAD. The documentation will cover what we are looking to use it for in the second sentence in this section. Below is a screenshot of the first paragraph of the LD_PRELOAD section from the man page:

The code we are interested in reviewing for the hijack shared object we will use in our attack is the ./src/rand_hijack.c file. Basically all you need to do to perform a hijack of any imported function in a program is build a shared object with a function of the same name and signature. Since rand() is a libc function, you can look it up in the man page or in the header file. If a shared object with a matching function name is preloaded into the binary, it will be used in place of the real function. The code for this file to hijack rand() is really simple; in fact, we only need 3 lines to make this work.

This version of rand() will simply return the static value of 42 as the “random number”. This means that the game will be using this hijacked version of rand() once we deploy this shared object in it using LD_PRELOAD, instead of the expected one in the libc libraries. This will make the game always generate a static “random” value of 42. This will make our game a lot easier to win!
Building the Hijack Shared Object
To build the hijack shared object binary, we will use the make command again from the root of the repo directory with the following command:
| make hijack |
The output from this command and a follow up ls -l command is shown below:
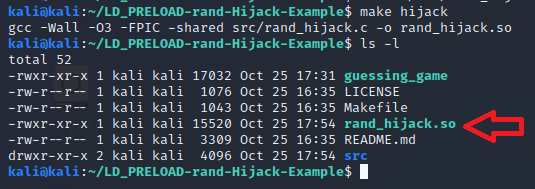
If you look at the gcc command that the make command ran, there are two very important switches that were used. I built the Makefile to make it easy to build, but you will want to know that these are needed should you need to build one on your own in the field. The first switch is the -FPIC switch. This switch makes the binary compile as Position Independent Code, which is normally how you’d build for a shared object. This makes the code understand that it will be loaded into a random address space and stop it from trying to make any assumptions about jumps or calls to fixed addresses. The second switch was the -shared switch, which tells gcc to build this as a shared object ELF. You can see that it is a shared object if you run the file command on it as shown below:

Using the LD_PRELOAD Hijack to Make the Guessing Game Not So Random
Now that we built the shared object binary, we can use it to make our game not so random anymore and easy to win. To perform the attack, all we have to do is set up an environmental variable called LD_PRELOAD and set its value to be either a relative path to our shared object or an absolute path to our shared object. Either way, one of those paths must be applied or it will search the normal library paths and not find the shared object.
For setting the environment variable, I would recommend doing it inline with the command rather than exporting it. The reason being that inline will only apply that environment variable to that command that is being executed. Setting it with the export command will leave it in the environment and any new processes you launch from that terminal will attempt to load the rand() hijacking shared object as well, and that’s not ideal.
To launch the game with the LD_PRELOAD environment variable hijack inline would be to use the following command:
| LD_PRELOAD=./rand_hijack.so ./guessing_game |
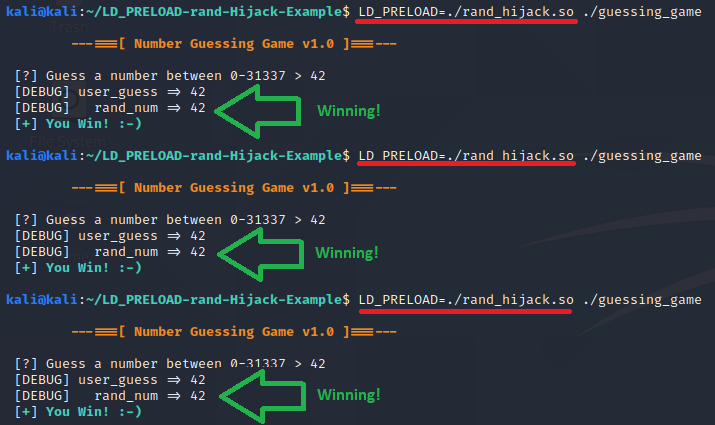
Now when we play the game a few times, continuing with the debug version of the game we built earlier and guessing the value 42, we will win every single time! Below is a screenshot of the hijack in action!
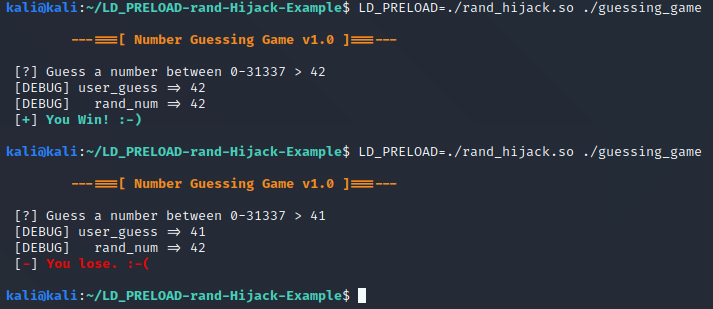
Just for fun, why not try guessing 41 to lose with the hijack in place? We can still see in the debug output that it’s still generating 42 as shown below:
Returning the Game to Normal Behavior
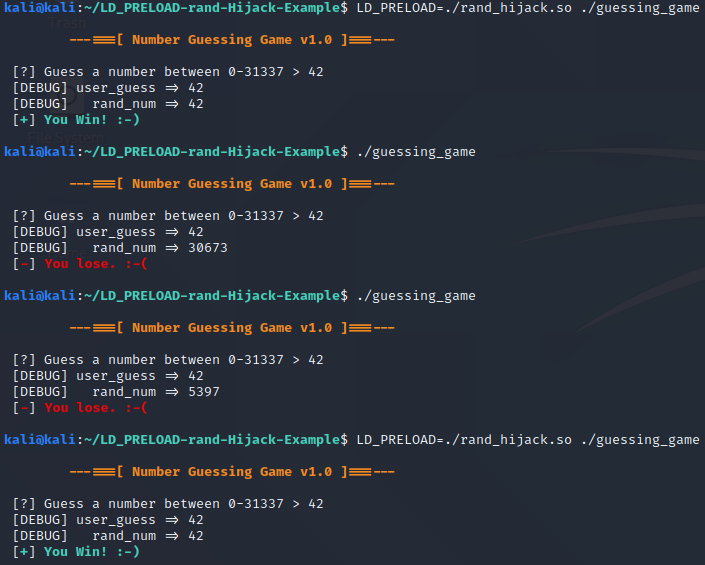
While the hijack is fun, the best part about it is that we didn’t touch or modify the original binary like you would if you did patching instead. This means if we want to go back to playing without the modified behavior, all we have to do is remove the LD_PRELOAD environment variable and it’s back to normal like nothing happened. Then we can turn it back on if we want to cheat again. Below is a screenshot of going from hacked, to two rounds without LD_PRELOAD that we lost, then turning the LD_PRELOAD back on and winning again.
Conclusion
As seen in the example covered here, LD_PRELOAD can be useful to modify the behavior of an application externally without having to patch the real binary itself. This is also a little more flexible than patching as it can be easily cross compiled and not be sensitive to the CPU architecture like binary patching would be. This makes it a flexible method of modifying behavior of an application. In future tutorials, we will also see that it can be used for more fine grain control over the imported functions or for debugging without using a debugger! I hope that you’ve enjoyed this example and that it helps make the function hijacking use case a little bit more clear. A video demonstration of this blog post has been created as well and is posted below:
If you’re interested in security fundamentals, we have a Professionally Evil Fundamentals (PEF) channel that covers a variety of technology topics. We also answer general basic questions in our Knowledge Center. Finally, if you’re looking for a penetration test, professional training for your organization, or just have general security questions please Contact Us.
LD_PRELOAD Series Blog Post
Interested in more information about LD_PRELOAD? This blog is a part of a series and the full list of blogs in this series can be found below:
