As I stood in front of a class of developers trying to explain cross-origin resource sharing (CORS), I knew I wasn’t conveying it well enough for a significant subset of the group. It was Autumn 2017 (not my password at the time, by the way), and I was on-site with one of our clients. We were doing a two-day secure-coding training for their PCI compliance requirement. I got to the topic of CORS on the afternoon of the first day, after approximately six hours of lecturing and labs. I explained it once with just the slides. The class had few questions, but I could tell from their faces that I hadn’t really explained the material in a way that they understood. The frustrating part was that I knew CORS inside and out, I was just struggling to transfer that knowledge to my students. I pulled together a couple of rolling whiteboards and tried again. I designated one board as the front-end of the application in a browser and the other board as the application server. My body was the physical representation of the communication traveling between the two, both the request and the response. I described the exchange of information up to the point where the browser’s native code examined the response for the CORS headers and decided whether or not to share it with the application’s JavaScript. Finally, I thought most of the class understood, although I’m certain some still did not. In that moment I knew that I wanted to have a better, more interactive visual aid for explaining that specific topic. That’s what prompted me to build Musashi (https://github.com/SamuraiWTF/musashi-js), a modular, open-source node.js application for demonstrating some simple-but-problematic-to-explain concepts. I built it for use inside of SamuraiWTF, but it’s an independent component that can stand alone as well.
Skip forward to August 2020, and we have the 2.0 release. Let’s take a high-level look at what makes up Musashi 2.0.
Cross-Origin Resource Sharing (CORS)
Demonstrator
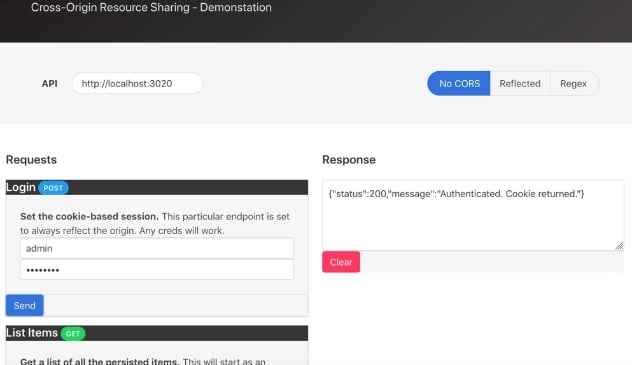
The CORS demonstrator is still there, consisting of both a client app and a REST API that facilitates CRUD (create/read/update/delete) operations with different CORS policies. Here’s what that view looks like in 2.0:

Most of this interface is functionally unchanged since the original iteration, but there have been some under-the-hood improvements. In the past, it expected api.cors.dem and client.cors.dem, and deviating those added a manual configuration step at runtime, and broke the pattern-based policy that allowed Origins that matched hardcoded regex. It now uses configurable hostnames supplied in the .env. The configured hostname for the API is automatically populated during the server-side render, so it doesn’t need to be manually configured after-the-fact. The regex for the pattern-based CORS policy is dynamically generated based on the specified client hostname, meaning that it will generally continue to work regardless of the names assigned.
Exercises
New to 2.0 is a pair of exercises to practice examining flawed CORS policies. These are small, straight-forward examples to help a student understand the dangers of misconfigured policy. Both examples relate to flawed regular expressions used when allowing origins. Each one indicates a particular goal the student is trying to achieve by modifying the request (most often the Origin header) in their interception proxy. They can also issue a sample request to be intercepted as a starting point.
Content-Security-Policy (CSP)
Demonstrator
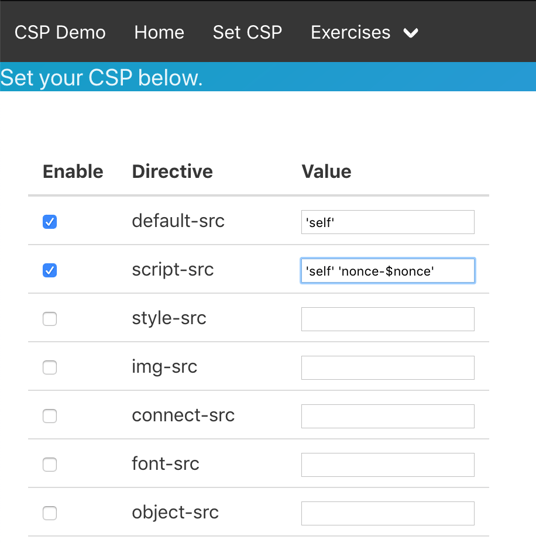
This module was created some time after the CORS module, to address the same type of issue explaining CSPs. The readme indicated it wasn’t ready for general use previously, that warning has been removed in 2.0 as it has matured enough. It’s a concept that is simply much easier to grok when you can see it. The centerpiece of this module is the CSP configuration function, seen here:

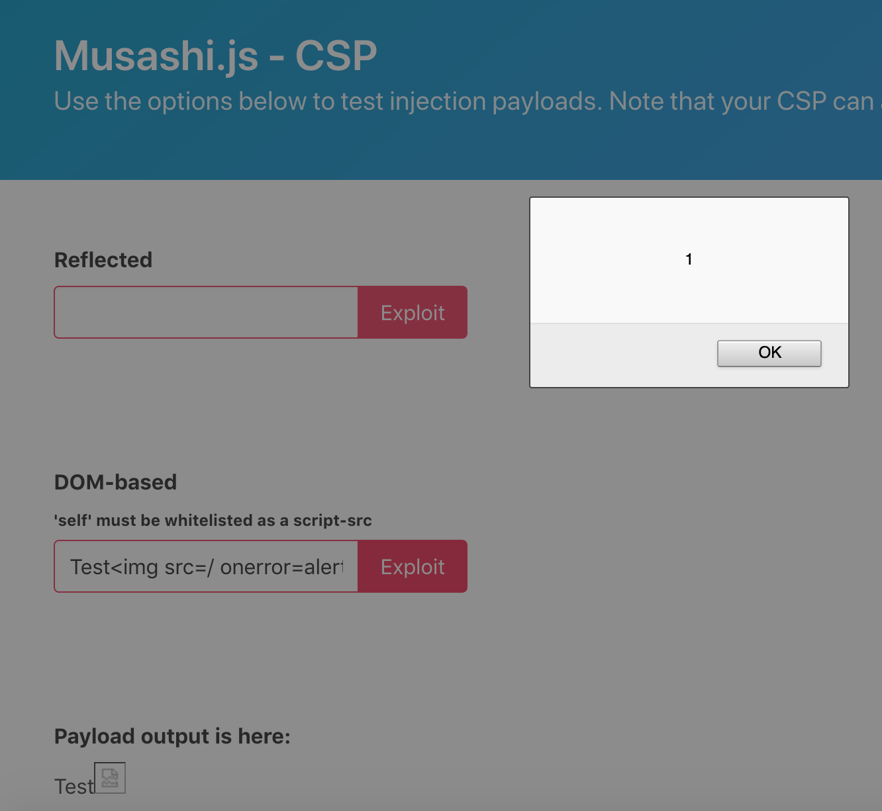
It lets the user set the CSP for the whole application, with the exception of that page. They can then navigate back to the home page, which has boxes for DOM-based and reflected injection of HTML and JavaScript. These are completely unfiltered and will write whatever input the user supplies to the page either through the server-side render (reflected) or fully client-side through JavaScript (DOM-based):

This allows the students and instructor alike to see how the CSP blocks different interactions, and how to amend the policy to intentionally allow certain things, such as inline scripts bearing a certain nonce.
Exercises
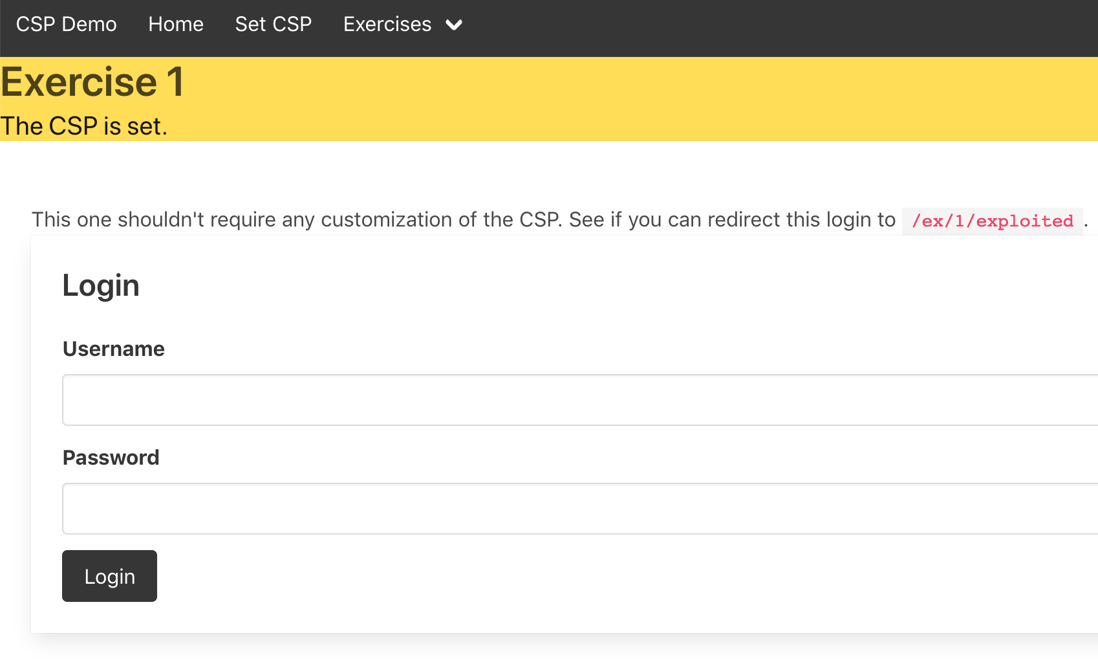
The CSP module has exercises as well. They have a one-click option to set their policy for the application. From there, the student can try to find an injection payload in the exercise that evades the CSP to achieve the defined goal. For example, the one below indicates that the goal is to inject a payload that redirects the credentials from this mock login form to what could be the attacker’s server.

Final thoughts
This is a work-in-progress, and will continue to be a work-in-progress with new modules on the roadmap, additional exercises to add, plus an endless train of bug-fixes and refinements. But as it stands today, it does what it was designed to do pretty well. I find there’s a tendency to ask developers to follow best practices that appear arbitrary, because they don’t come with an explanation of why. Often this works well from a security standpoint, up until the point that some technical or business edge-case forces them into a customized build that has to diverge from the best practice. Tiny details are the difference between a well-secured implementation and a major security flaw. If we don’t empower developers with the understanding necessary to critically evaluate security issues themselves, we are setting them up to fail. My hope is that this project contributes some small amount to helping those who teach developers and security folks, to better empower those students to make decisions about security as it relates to the limited set of topics covered by Musashi.