I wanted to provide some information about hardware and firmware hacking in our blogs. To get the ball rolling with this, I figured we can start off by exploring simple interfaces and protocols.
As the old saying goes “know thy enemy”. Before getting started, we should attempt to learn about common practices in the hardware world. The first interface we will talk about in this series is the UART interface. The goal of this article is to help you:
- Understand what the UART interface is
- How it works
- How it’s typically used
Future articles on UART will cover Identification and interfacing with UART. Today’s blog will primarily focus on UART as an interface and the concepts you need to understand first.
Overview of the UART Interface
UART stands for Universal Asynchronous Receiver-Transmitter. The UART interface is a serial communication interface that allows for asynchronous communication. It can be configured for:
- Simplex - One-way communication
- Example: Sensor sending simple reading values back. This component would only need to send output and not take input due to being a simple single function component
- Half-duplex - two-way communication where the devices take turns
- Example: Two devices are connected and one will issue a command and wait for the results to come back before continuing
- Full-duplex - two-way communication where the devices can send and receive at the same time
- Example: A full-on Linux /bin/sh terminal. We might need to send a Ctrl+C interrupt while output is currently being sent back to us
Typical 4 Pin Layout
These interfaces are usually 4 pins.
- VCC - This is usually a voltage pin, typically 3.3 or 5 volts
- TX - The transmit data pin
- RX - The receive data pin
- GND - The ground pin
While this is normally how it’s laid out, engineers are free to minimize it down to just the TX and RX pins if they want to.
Minimum Required Hook Up
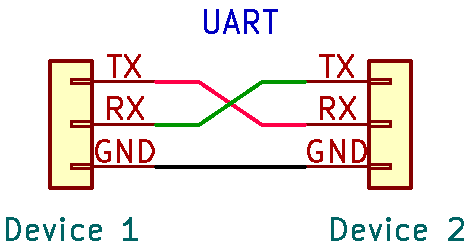
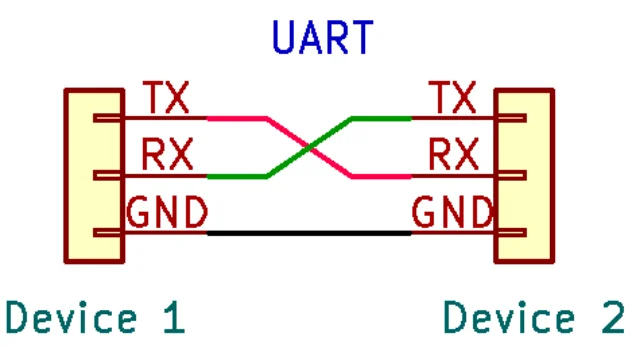
At Minimum you need to connect 2 Pins: The TX and RX pins. These two pins need to be crossed between the two devices. The reason for this and an example are covered in the next section of this article.
However, I would recommend the 3 pin connection: The TX and RX pins, plus the GND pin so the serial device and your adapter share a common ground.
Generally, you can skip hooking up the VCC pin as it’s seldomly needed for testing/hacking purposes since we will likely have the device powered. If in doubt, skip hooking the VCC up unless you have a known reason for doing so.
Crossing the TX and RX Pins
If you may have noticed in the image for this blog, the wires between the two UART devices cross the TX and RX pins.

This is because the transmit pin (out) needs to be connected to the receive pin (in) on both devices. This can cause some confusion, since it’s not matching labels (e.g. TX <=> TX). Other types of interfaces address this confusion by making pins like MISO and MOSI, which would be a label matching hook up. Either way, just be aware that with UART the TX and RX need to be crossed between devices.
What Sort of Information Can be Found on UART?
As stated earlier, this is a serial communication interface. So what sort of data is this used to communicate? Well, that can vary depending on the device.
Sometimes it might just be real-time sensor readings or logs. An example of this might be a device such as an IC that is designed to provide some sort of sensor reading, or an MCU that is sending debug messages for diagnostics purposes. A great way to learn some of this is to play around with Arduino using the serial interface.
Another common type of data you might see when interfacing with UART is diagnostics and calibration menus. While not a full shell, these are often found on devices for factory or field technicians to help troubleshoot or fix common issues with a device. Sometimes there can be useful information or neat hidden features here. This can also provide a possible attack vector for memory corruption bugs since this is being provided by the firmware and likely has not been hardened against software attacks, since only technicians should be using it.
Finally, my personal favorite and a fairly common thing to see on a UART interface in embedded devices - a full Linux /bin/sh terminal! These are fairly common and can allow you to watch and/or interrupt the bootup (usually UBoot). Once booted it often turns into a BusyBox /bin/sh shell.
Oftentimes, root is the only user on the system and I’ve seen several devices just drop straight into a root prompt without a login. The few that did require a login usually had weak passwords such as root, password, or admin.
Conclusion
I hope you enjoyed today’s article on the UART interface. In the next blog, we will talk about discovering these in the real world and how to map out the pins using a multimeter.

