Normally I don’t like having my interception proxy hide out-of-scope traffic. Doing so creates a blind spot for third-party interactions that might be important to see. For example, if I’m feeding attack payloads into a form field, and they’re being sent to an out-of-scope service, I might accidentally attack that service, which wouldn’t be very good. Also, it might hide vulnerabilities like referer leakage. However, once you have thoroughly mapped the app, sometimes it’s nice to create grouping for your request traffic, or to eliminate some out-of-scope traffic that you’re capturing to make it easier to look for specific requests. ZAP has two loosely-related mechanisms for dealing with this, scopes and contexts. This was a departure from Burp, which I normally use, and which has the concept of Scope but doesn’t have a good analog to ZAP’s contexts.
What’s the difference between Scope and Context?
- A Context in ZAP consists of a grouping of paths described by one or more inclusion rules. Subpaths or individual resources can be removed from the context by adding exclusion rules. There are additional settings and metadata related to contexts, such as the technologies used, and authentication related information. These are useful groups for targeting ZAP’s automated tools, which we’ll dig into later in the series.
- Scope is what you’re actually allowed to attack. You can use it to filter several views in ZAP, and the automated tools shouldn’t ever send attack payloads to paths outside your scope. I construct the scope by marking one or more Contexts as in-scope.
Before Beginning…
There’s a drop-down just about the Sites tab for setting ZAP’s mode. The default was Standard Mode. I actually discovered a bit later on, that Protected Mode is a better option to help keep you in-scope.
Even resending requests and fuzzing will be prevented against out-of-scope paths when you’re in Protected Mode.
Creating a new context
I found a few ways to create a context, but my preference was just to use the New Context button at the top of the Sites pane.
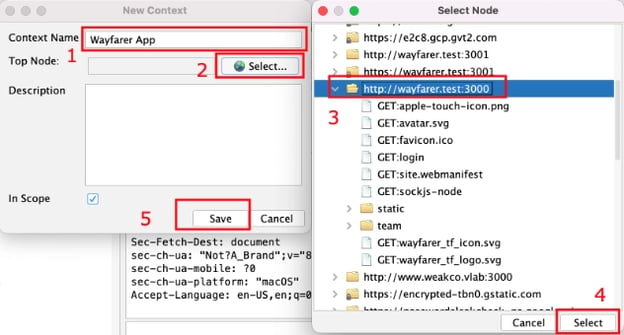
This will open up the New Context dialog, as shown below.

- Add a nice descriptive name
- Use the select button next to the Top Node box to open the node tree.
- Find the root of the app you want to include.
- Click Select to confirm your node selection.
- Use the Save button on the New Context dialog to create your context.
You might also notice the In Scope checkbox was checked on my New Context dialog. The Wayfarer App entry now appears under the Contexts section at the top of the Sites tree as pictured.
Marking Contexts as In-Scope or not In-Scope.
The red circle in the middle of the Wayfarer App context’s icon indicates that it’s in scope. Your default context might also be in-scope by default. Marking it out-of-scope is as simple as right-clicking on it in the Sites pane and selecting Remove From Scope.
For a context that is already out-of-scope, the same right-click menu will have an Add to Scope option.
Modifying the Context
Adding an Additional Host
Using the right-click context menu, I can add items to the context from the History pane or the Sites tree view on the left side of ZAP’s main window. For example, I added wayfarer.test:3000, which is the single-page app, but it uses an API on port 3001. If I locate the wayfarer.test:3001 entry in the Sites menu, I can add it to my Wayfarer App context, as pictured.
This will open the Session Properties dialog, with the Wayfarer App context selected, and populate the new entry under the Regex list for the host I added. I don’t really need to do anything at this time, so I can just click OK when I’m done.
You might have noticed that the Include in Context submenu and had a New Context option as well. I could have created my context from there in the first place, but I haven’t found a way to give it a descriptive name if it’s created that way. (Update: In Simon's feedback post, he pointed to where the renaming box is in the contexts top node of the session properties).
Excluding items from the context
Now, let’s imagine there’s a particular subtree or a specific path of the API that I’m treating as out-of-scope. I can use my right-click context menu once again, but this time to select an item to remove from the context. Again, this is available on both the Sites pane and the History pane. I’m going to use the History pane for this example, selecting the entry for wayfarer.test:3001/auth/refresh.
This again opens the Session Properties, this time showing the Exclude from Context options with an entry prepopulated for the path I’d selected. If I wanted a whole subtree, I would want to see the regex ending with a regex wildcard (.*).
Again, ZAP has already added the entry to the list, so I can just use the Save button to close the dialog. If I open up the tree for the wayfarer.test:3001 host on the Sites pane, I’ll see that the In-Scope target icon is not present on the GET:refresh resource.
Filtering Views based on Scope
Several panes in ZAP have a target button that can be toggled on and off. When on, it limits the view to only in-scope items. In the picture below, I’ve enabled it for the History pane.
In Summary…
It makes sense to construct at least one context and include it in the scope even if you’re exclusively doing manual testing. When we look at the automated tooling in ZAP, scope and context will be essential to targeting those tools correctly.
Check out Day 6 for leveraging ZAP’s passive analysis to see flaws it has been detecting all along.


