In this day and age, web and mobile applications are often backed by RESTful web services. Public and private APIs are rampant across the internet and testing them is no trivial task. There are tools that can help. While (as always with pen-testing) tools are no substitute for skill, even the most skilled carpenter will be able to drive nails more efficiently with a hammer than with a shoe.
One such tool is Postman, which has been popular with developers for years. Before we get into how to set it up, here’s a quick overview of what Postman is and does. Postman is a commercial desktop application, available for Windows, Mac OS, and Linux. It is available for free, with paid tiers providing collaboration and documentation features. These features are more relevant to developers than penetration testers. It manages collections of HTTP requests for testing various API calls, along with environments containing variables. This does not replace your proxy (Burp, ZAP, Mitmproxy, etc), but actually stands in as the missing browser and client application layer. Main alternatives are open-source tools Insomnia and Advanced REST Client, commercial option SoapUI, or custom tooling built around Swagger/Swagger UI or curl.
Setting Up Postman
Postman is available from its official website at https://www.getpostman.com, as an installer for Windows and MacOS, and a tarball for Linux. It can also be found in a Snap for Ubuntu (https://snapcraft.io/postman), and other community-maintained repos such as the AUR for Arch Linux. The first step to setting it up is, of course, to install it.
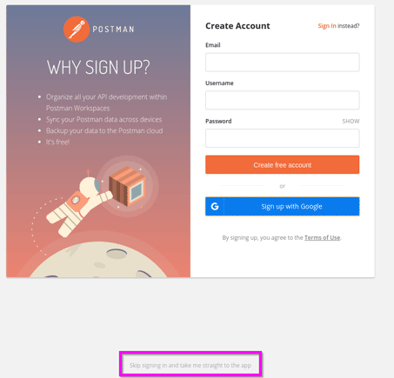
Upon first launching Postman, you’ll be greeted with a screen prompting you to Create an Account, Sign up with Google, or sign in with existing credentials. However, Postman doesn’t require an account to use the tool.
The account is used for collaborating/syncing/etc; the paid tier features. As I mentioned earlier, they’re great for developers but you probably don’t care for them. In fact, if you generally keep your clients confidential, like we do at Secure Ideas, you probably explicitly don’t want to sync your project to another 3rd party server.
If you look down near the bottom of the window, there’s some light gray text that reads Skip signing in and take me straight to the app. Click that, and you will move to the next screen – a dialog prompting you to create stuff.
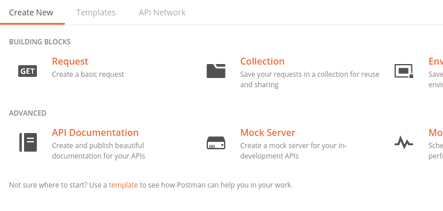
There are several parts you’re not going to use here, so let’s look at the three items that you actually care about:
- Collection – a generic container you can fill with requests. It can also act as a top-level object for some configuration choices, like Authentication rules, which we’ll expand on later.
- Request – the main purpose for being here. These are the HTTP requests you will be building out, with whatever methods, bodies, etc. you want to use. These must always be in a Collection.
- Environment – holds variables that you want to control in one place and use across requests or even across collections.
The Basics of Working with Postman
It’s time to create our first Postman Collection and start making requests.
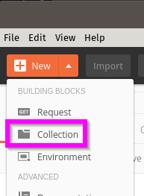
The New button in the top left is what you will use for creating Collections and Requests, typically. Start by creating a Collection. This is sort of like an individual application scope. You will use to group related requests.
A collection can also act as a top-level item with Authentication instructions that will be inheritable for individual requests.
For now, just name it something, and click the Create button. I called mine Test Collection.
By default, you will have an unnamed request tab open already. Let’s take a tour of that portion of the UI.
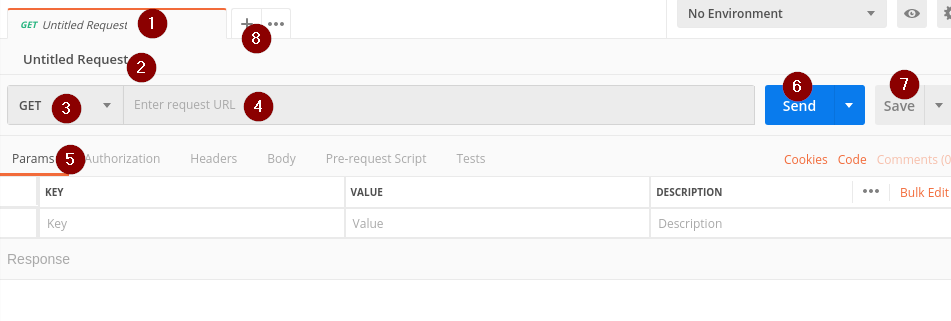
- The active tab
- The name of this request. This is just some descriptive name you can provide for it.
- The HTTP Method. This drop-down control lets you change the method for this request.
- The URL for the request. This is the full path, just as if it was in your browser.
- The tabbed interface for setting various attributes of the request, including Parameters, Headers, Body, etc.
- The send button. This actually submits the request to the specified URL, as it is currently represented in the editor.
- The save button. The first time you click this, you will need to specify your collection, as the request must belong to a collection.
I have a sample target set up at http://localhost:4000, so I’m going to start by filling in this request and saving it to my collection. It’s going to be a POST, to http://localhost:4000/legacy/auth, without any parameters (what can I say? It’s a test API. It’ll let anyone authenticate). When I click the Save button, I will name the request and select the Collection for it, as below.
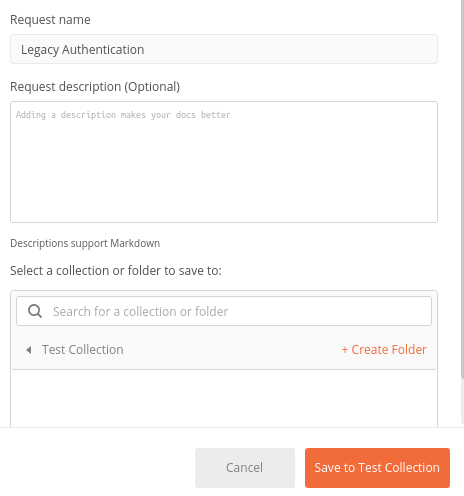
Then I’ll click Save to Test Collection (adjust for your collection name) to save my request. Now, clicking the Send button will issue the request. Then I will see the Response populated in the lower pane of the window, as below.

- The tab interface has the Body, Cookies, Headers, and Test Results. We haven’t written any tests yet, but notice the badges indicating the response returned 1 cookie and 6 headers.
- The actual response body is in the larger text pane.
- We have options for pretty-printing or Raw response body, and a drop-down list for different types (I believe this is pre-populated by the content-type response header). There’s also a soft-wrap button there in case you have particularly wide responses.
- Metrics about the response, including HTTP Status Code, Time to respond, and Size of response.
A Side-Note about Cookies
Now, if we reissue our request with Postman, we’ll notice an important behavior: the cookie that the previous respnse had set will be included automatically. This mimics what a browser normally does for you. Just as you would expect from the browser, any requests Postman issues within that cookie’s scope will automatically include that cookie.
What if you want to get rid of a cookie?
That’s easy. Just below the Send button in Postman, there’s a Link-like button that says Cookies. Click that, and it will open a dialog where you can delete or edit any cookies you need to.
And that’s it in a nutshell for Cookie-based APIs. But let’s face it: it’s more common for APIs to use Bearer tokens than it is to have them use Cookies, today. We’ll address that in the upcoming section, along with some other, more advanced concepts.
What’s Next
In Part 2, we’ll proxy Postman through Burp Suite, and talk about the advantages of that approach.
In Part 3, we’ll dig into some more advanced usage of Postman.
In Part 4, we’ll use some Burp Suite extensions to augment Postman.
Again, if you’re looking for a more high-level overview of the difference between penetration testing APIs instead of web apps, check out the article in our Knowledge Center.
