

In this part, we will use some of Burp Suite’s extensions to augment your API testing toolchain. We’re going to introduce some useful components for working with JWTs (JSON Web Tokens), and for more efficiently finding authorization problems. These extensions are not exclusive to API testing either, they can help with regular web application tests as well.
Setting up Jython
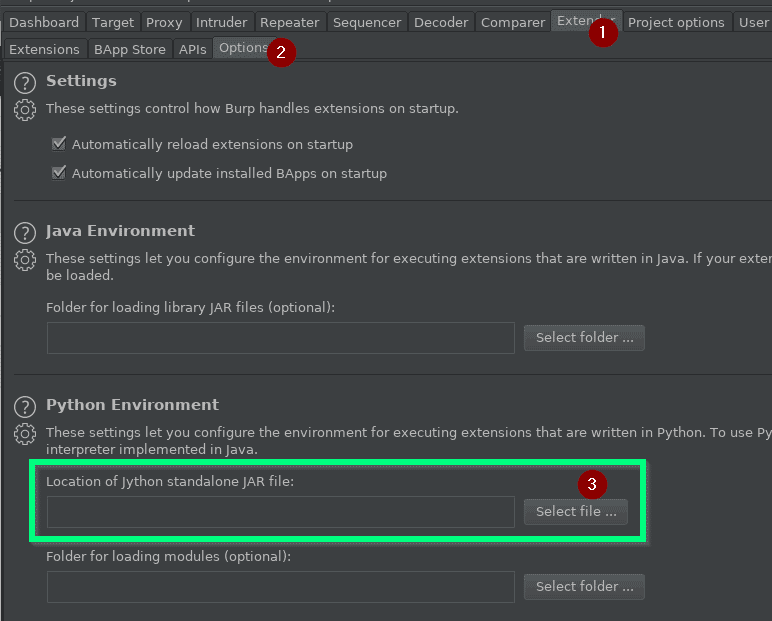
Some of these extension require the Python Environment to be set up in Burp Suite, which isn’t configured by default. If you already have this, move on to the next section. If not, got to Extender -> Options and set the location of the Jython standalone JAR. If you need the jar, you can get it from jython.org.
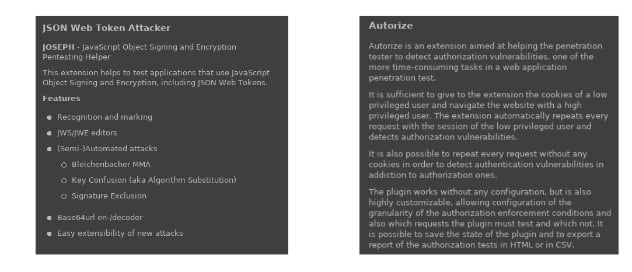
Once you set the location, you can navigate to the BApp Store tab and start downloading the extensions we’re going to use. The two I want to highlight are JSON Web Token Attacker and Autorize.
Now let’s look at each of these plugins in more detail.
JSON Web Token Attacker
There are many ways of handling authentication and authorization. JWTs are perhaps the most common approach on modern APIs. If you examine the Bearer token in the following image, you will notice the obvious signs of a JWT in use: three segments, separated by period characters. Base64 encoded header and claims sections, followed by a cryptographic signature.

This token can easily be decoded in Burp Suite’s built-in Decoder. Simply select the token and Base64 decode the whole thing. The one pictured will decode into the following:
{"alg":"HS256","typ":"JWT"}.{"userid":1,"tokenid":"fac15939-de30-481d-9d13-6ae89ecd7370","iat":1552444637,"exp":155244823N30.[cryptographic stuff]
While Decoder is forgiving enough to decode it this way with minimal corruption, I’m likely to want to modify and re-encode it. Doing so will produce the following:
eyJhbGciOiJIUzI1NiIsInR5cCI6IkpXVCJ9LnsidXNlcmlkIjoxLCJ0b2tlbmlkIjoiZmFjMTU5MzktZGUzMC00ODFkLTlkMTMtNmFlODllY2Q3MzcwIiwiaWF0IjoxNTUyNDQ0NjM3LCJleHAiOjE1NTI0NDgyM04zMC7colISpedlNHItBvijbS0TmYWzzIFAAOmykTIWurMtDzVJ
This starts similarly to the original value, but is most-definitely different. That’s because a JWT isn’t a single base64 encoded string. The header and claims are separately encoded, with any padding (represented by one or two equals signs) removed.
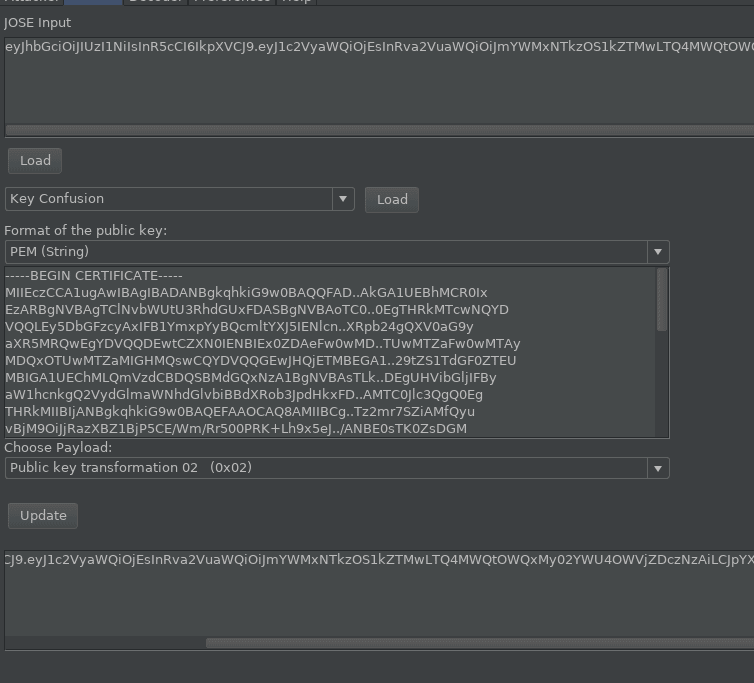
There are a few JWT implementation flaws, although most are quite rare. Exploitation for them involves tampering with the JWT and re-encoding it. While this could be done manually, JSON Web Token Attacker makes that much easier. I simply copy the value from the request, and switch to the JOSEPH tab in Burp that this plugin added. Next I navigate to the Manual sub-tab, and paste the value into the input box. Then I click the Load button.
This populates the interface with an attack selection dropdown box. There are two attacks in there: Key Confusion and Signature Exclusion. While a deep-dive into these attacks is outside the scope of this post, a quick summary is that either of these will change the alg value in the header to a different algorithm; either switching it to a None value, which says the signature isn’t required, or switching it from asymmetric to symmetric cryptography, which can allow us to generate a valid cryptographic signature with the public key. The security impact of either is that the cryptographic signature is typically the only thing guaranteeing the integrity of the token. If an attacker can defeat the signature, the token can be modified to have any claims the attacker wants. In this example, this could mean changing the user ID to assume a session with someone else’s account.
Let’s look at signature exclusion to step through a basic manual attack:

- Load the input
- Select Signature Exclusion
- Load
- Choose a payload. These are variants of the word None.
- Update.
- Take the value generated and use it in Repeater. If you started with a valid JWT, and the tampered version is accepted, you’ve succeed in your attack. You can now proceed to actually tampering with the claims.
The actual usage for Key confusion is almost the same, except you need to supply the public key and a transformation on it. This is generally something to attempt if RS256 is the signing algorithm, and the public key is available to verify the signature.
Another observation you may have made is that your Proxy History now has highlighting and a new context menu.
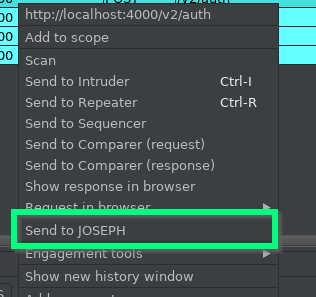
This is there for semi-automated attacks with the plugin. I personally prefer not to use the plugin in this way, partly because I have found it sometimes gets confused and produces incorrectly formed requests, and partly because I like to keep strict control of what traffic I’m sending. Also, for the rare case of systems that implement a JWT invalidation blacklist, malformed tokens can get the session blacklisted.
Still, even the Manual mode significantly simplifies generating the modified JWTs. That makes it a frequently useful tool for API tests. I find that the implementation issues that allow these exploits seem to be uncommon, but they should always be tested given their severity.
Autorize
There are a variety of authorization problems that can occur in an API. Unless the API is completely public, you at least have authenticated versus unauthenticated access. If there’s a concept of resources or data owned by specific users, then it makes sense to validate that one authenticated user cannot access any resources that they do not own. Some APIs also have multiple vertical levels of access, especially if there’s the concept of an organization. One user may have access to more data or functionality than another. Again, it’s up to the tester to confirm that this is being enforced. Finally, in a multi-tenant system (e.g. each client org has their own isolated space) leakage of data or access between tenants is one of the biggest concerns.
For all of these cases, the common test strategy is to map the resources and functionality with a user who has the correct privileges to be permitted access. Then we reissue the same requests with a different access token or session, and compare our access. When the permission model has any real complexity, this can be quite time-consuming. Autorize can make this testing significantly more efficient. Let’s start by navigating to the Autorize tab in Burp, so that we can work through the bare minimum setup.
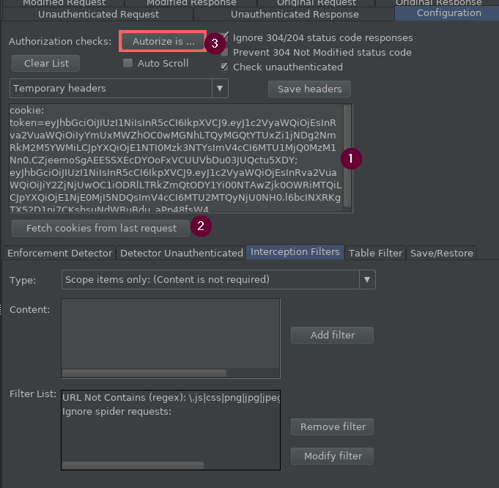
- There’s a great big text box for headers we want to replace when switching authenticated contexts. This can include cookies and any other request headers, written as they would be in a normal request. For example Authorization: Bearer whatever would replace my current Authorization header with the supplied one with a bearer token of whatever.
- In the case of cookies, you can automatically populate that box with the Fetch cookies from last request button.
- The highlighted Autorize is… button is used to toggle the plugin on and off. When off, Autorize does nothing. When on, the incoming requests that hit the proxy* will be reissued with the replacement headers/cookies you supplied, and again with those headers/cookies omitted.
*The interception filters tab in the bottom section can be used to determine what requests are included.
Now that Autorize is set up, you can issue new requests through Postman, and notice the Autorize matrix on the left being populated.

My sample API happens to have identical responses, as you can tell by the three numeric columns showing the response lengths (74 and 6 respectively). The first of those is the response to the unmodified request, the second has the substitute token, and the third is the unauthenticated response. The remaining two columns indicate enforcement with traffic-light like colors. The amber response pictured is an uncertain response, while red and green are used for more confident indicators whether authorization is not enforced or enforced respectively.
Now, the determination of when auth has been enforced can be tweaked using the Detector Unauthenticated and Enforcement Detector tabs at the bottom. These allow creation of match conditions based on your understanding of how the API behaves, and can greatly improve the matrix’s interpretation of the responses. This is certainly worth the effort for larger APIs, or those you anticipate testing multiple times. However, for one-off tests, I often don’t tune this, but instead I manually examine any response where there’s a discrepancy in response or length.
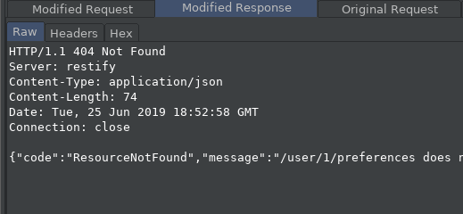
The tabs on the right side of the Autorize UI can be used, much like the typical request and response tabs in Burp, to examine the Modified and Unauthenticated requests and response. This is critical to investigating why there are differences, what the API did, and whether it was the right thing to do.
In Summary
While not comprehensive, this hopefully provides enough of an introduction to get started with these plugins which are useful on the majority of API tests, at least of modern APIs. Autorize is excellent for APIs and SOAP services as well, while JSON Web Token Attacker is very specific to the one common authentication style which has become quite prevalent, especially with its use in OAuth2 implementations.