

Today I want to continue the series on using LD_PRELOAD. In previous posts, we covered how to inject a shared object binary into a process, and use that to hijack a library function call to run our own code. This is great when we want to overwrite the behavior of external library calls in a process, but we would have to wait for that call to happen first before our code can run. What if we want to run code before the program even runs from within the target process? Today, we are going to explore how this can be accomplished and look at a few use cases where this could be useful. The idea here is to cover this topic so it’s clear for future posts that will leverage this behavior. The code examples used in this blog are available on the Secure Ideas Professionally Evil Github Repo. The example was built to run in a Kali VM if you’d like to follow along as you read.
Why Would We Want to Do This?
There are several instances where you might want to do this. Outside of LD_PRELOAD injection, this is just good knowledge to have in case you ever start trying to build shared objects. The concept here works outside of the LD_PRELOAD trick and allows you to have your library initialize itself at load time. If you are familiar with object-oriented programming, this is similar to the way a class might make use of constructors and destructors. These constructors and destructors also work in regular ELF binaries as well, especially if you want to run some code before main() is run.
In the scope of LD_PRELOAD, this trick allows you to run code before the application starts and can also allow you to run code without hijacking a function the application intends to call. One use case for why you might want to do this is so you can print messages at load time, which allows you to visually confirm that the library injected successfully. You can at the same time print usage of how you can interact with the library. Later blog posts will show a few ways to make LD_PRELOAD objects that you can interact with, mostly using environment variables. It’s nice to explain this at runtime with documentation, instead of having to dig through code.
Another use case is that you can analyze the process space of the program you’re injecting into before it runs. Your library is running in the context of the process it is injected in. This means that your shared object can read and write to memory within the process itself. A good example of this is on the wargame site, OverTheWire.org, where one challenge has a process that isn’t readable to your user, but can be run by your user, and contains a hardcoded password. You can build an LD_PRELOAD library and inject it into that process and use it to read the memory of the process and dump it into a file in the /tmp directory that your user can read.
Constructor and Destructor Attributes
In Linux C, functions can be declared with attributes within the function definition. This is done by adding the desired attributes to the function definition. There are two attributes of interest, constructor and destructor. A function with the constructor attribute will run before the program executes main(). For shared objects, this would occur at load time. A function declared with the destructor attribute should run once main() has returned or exit() is called. More information on function attributes can be found on the GNU GCC online documentation site.
Adding constructor and destructor attributes to a function is pretty simple. Take the following function:
| void run_me_first() { puts(“I need to run before main()!”); } |
To utilize the constructor attribute, we would add the __attribute__() to the function definition. The code for this function would instead look like this:
| void __attribute__((constructor)) run_me_first() { puts(“I need to run before main()!”); } |
That function will now be run before main(). Now if we wanted to run code at the end of execution, be that returning from main() or calling exit() in an ELF binary, or unload time for a shared object, we would want to set a destructor. Take the following function for example:
| void run_me_last() { puts(“I need to run at the end of execution!”); } |
We would simply add the __attribute__() to the function definition, but provide it with the destructor attribute instead of the constructor attribute. The resulting code would be as follows
| void __attribute__((destructor)) run_me_last() { puts(“I need to run at the end of execution!”); } |
With that destructor attribute added, the code should be run when the program exits. This is pretty simple to see here, but let’s run through a hands-on example of using this in LD_PRELOAD as a shared object. As mentioned earlier, the code that will be used in this walkthrough can be found on the Secure Ideas Professionally Evil Github Repo and should work in a Kali Linux VM if you want to follow along.
Cloning the GitHub Repository
The first thing we will want to do is pull down our example code. In a Kali VM, open up a terminal and run the following command to download the example code:
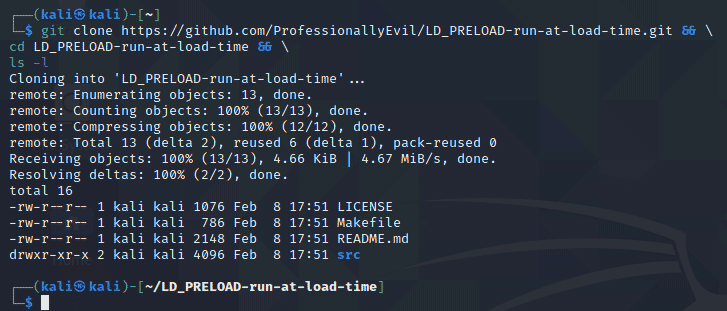
| git clone https://github.com/ProfessionallyEvil/LD_PRELOAD-run-at-load-time.git && \ cd LD_PRELOAD-run-at-load-time && \ ls -l |
This will download the repository (repo) to whatever directory you are currently in and will change to the directory it created and list its contents. Assuming everything went correctly, you should see output like the following:
Overview of the Files Downloaded
The repo for this example is pretty straightforward, however I still wanted to take a moment to explain the file structure to the repo so we’re all on the same page.
- ./LICENSE: This is a file with the LICENSE for the repo. It is licensed with the MIT license.
- ./Makefile: This is the make file. It has build targets that explain to the make command how to build the project. This will be covered in more detail in a later section.
- ./README.md: The standard readme file for the Github repo.
- ./src/: The directory that contains the source code files for the game and shared object.
- ./src/hello_world.c: The source code for the hello world binary that will serve as our target binary to use LD_PRELOAD against.
- ./src/inject.c: The source code for the inject.so shared object that we will use to demonstrate the use of constructors and destructors for running code without hijacking.
Reviewing the Code for the Hello World
The code for hello_world.c is also pretty straightforward. This is a basic hello world program that is used generally to teach people the basics of C as a first program to write. This application will simply:
- Use the puts() function to print “Hello World!” to the console.
- Return 0 when leaving main() so that will be the exit status.
This application doesn’t take any input from the user as either a prompt or argument. It’s a pretty static program.
Using Make with the Supplied Makefile
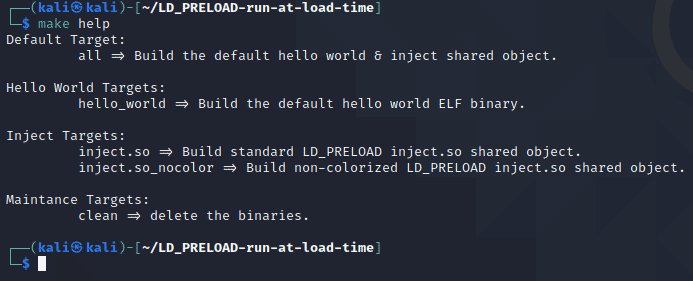
Back in the parent directory of the repo, there is a Makefile. This file will be used anytime you call the make command. Calling make without any arguments will invoke the default build target which is all to build the hello_world program and the inject.so shared object binaries in the root of the repo directory with the default settings. There is also a help target that can be invoked to show you all of the build targets you can use with make. The inject.so shared object can be built as a with or without color support. The default build will be with color support on the inject.so shared object. Below is a screenshot of the make help output:
Building Hello World
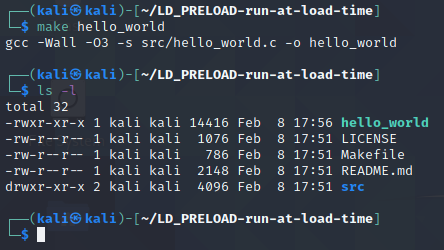
To get started, let’s build a default version of the hello_world binary using the following make command:
| make hello_world |
That command should create the binary for the hello world program in the root of the repo directory as ./hello_world. The output from that make command and a follow-up ls -l should show the following output:
Running Hello World Without Injection
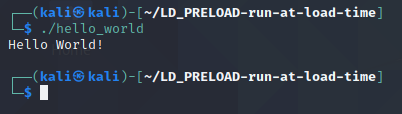
The program run by itself isn’t very exciting. When ran, it would just print “Hello World!” and exit. The screenshot below shows what a normal run of this program would look like for reference.
Reviewing the Code for the Inject.so Shared Object
The code for the inject.c file we will cover a little more in depth. This file contains two functions that will not be used to hijack functions, but instead make use of the constructor destructor attributes to be run before and after main() when injected into our hello_world binary. These functions will simply run some print statements so we can see it visually in the console and the constructor will also demonstrate some light in-process enumeration of the /proc/self/ filesystem and how getpid() works when running from a library injected into a process. First let’s list out the two functions and why they are there as a high level overview, then we will dive into each part of the code a little more thoroughly.
- run_me_at_load_time(): Constructor – Will run before main() in the process and will print a message showing it was loaded, and print the PID and path of the process it is injected into. The PID is obtained by using getpid() which will get the PID of the process we are injected into. The path to the process will be determined by resolving the symlink at /proc/self/exe using readlink().
- run_me_at_unload(): Destructor – Will be run after main() and simply print a message stating the shared object is being unloaded.
First let’s review the run_me_at_load_time() function. The screenshot below shows the complete code for the function.
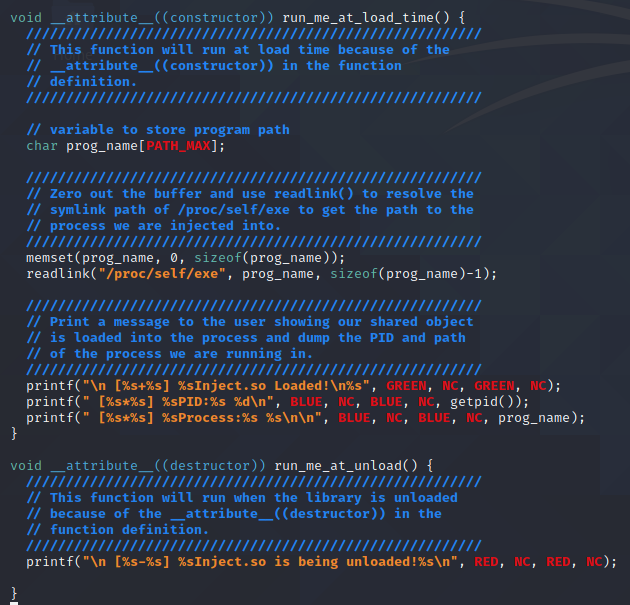
Most of the comments within the function explain the code, but there are a few things I want to point out. The function declaration is important:
| void __attribute__((constructor)) run_me_at_load_time() { |
The use of the __attribute__((constructor)) is what sets this function as a constructor that will run at load time. After that, we declare a char array buffer called prog_name which will be used to store the path to the program we are running in.

The following two lines will zero out the prog_name buffer to ensure it’s clean before using it and get the path to the binary and load it into the prog_name buffer. It will get the name of the binary by using readlink(), a function that resolves symbolic links, to get the real path that the symbolic link /proc/self/exe resolves to. The use of the /proc/self/* filesystem is kind of exploiting the fact that our library is injected into the process that it is. This filesystem contains information related to the process and /proc/self/exe will point to the binary for the process.

The final lines of code are all printf() statements to display information to the user. The first line simply states that we are loaded. The second line will print the PID of the process we are injected into by using the getpid() function. The final line prints the path to the process binary we got from the previous section.

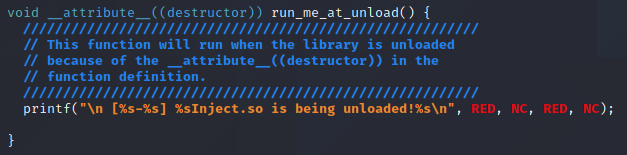
The next function is the run_me_at_unload() function which is the destructor function of the library. This is function declaration as via the __attribute__((destructor)) section. Overall, This function is pretty static and will simply print a message stating that the inject.so library is being unloaded.
Building the Inject.so Shared Object
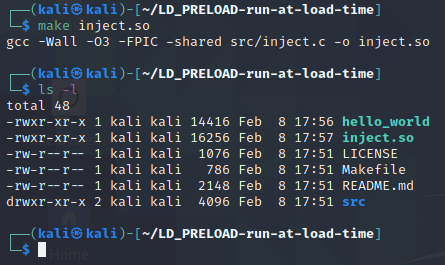
To build the inject.so shared object binary, we will use the make command again from the root of the repo directory with the following command:
| make inject.so |
The output from this command and a follow up ls -l command is shown below:
If you have questions regarding some of the switches used in the gcc command that the make command used, please see the last post in this series titled Not-So-Random: Using LD_PRELOAD to Hijack the rand() Function. That post has an explanation about what all the switches are there for.
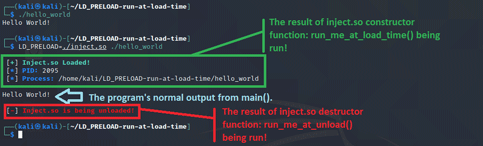
Running Hello World With the Injection
Now that we built the shared object binary, we can inject it into the hello_world program and watch our constructor and destructor functions being triggered before main() in hello_world is allowed to run. To inject it we will use the LD_PRELOAD environment variable again like in the previous post and have that pointing to our inject.so shared object.
Conclusion
As seen in the example covered here, LD_PRELOAD can be used for more than just function hijacking! This can be useful for running code within a binary without having to hijack a function call it’s attempting to make. Once a shared object is injected into a process, it operates within the context of that process. Your shared object sitting inside a process can access the /proc/self/ filesystem and obtain or modify any data related to the process itself including its memory contents. I hope that you’ve enjoyed this example and that it helps make the use of constructor and destructor attributes a little bit more clear for running code without function hijacking.
If you’re interested in security fundamentals, we have a Professionally Evil Fundamentals (PEF) channel that covers a variety of technology topics. We also answer general basic questions in our Knowledge Center. Finally, if you’re looking for a penetration test, professional training for your organization, or just have general security questions please Contact Us.
LD_PRELOAD Series Blog Post
Interested in more information about LD_PRELOAD? This blog is a part of a series and the full list of blogs in this series can be found below: