

Overview
A processor understands bytecode instructions specific to that architecture. We as humans use mnemonics to make building these instructions easier than remembering a bunch of binary codes. These mnemonics are known as assembly instructions. This is one of the lowest levels of programming that can be done. This programming is a bit of a lost art and I remember trying to learn about it, there was not much material on the internet regarding it. This series is designed to discuss some basic tutorials and to give examples for people to get started with when it comes to building X86 assembly on Linux-based systems.
Why Though?
Assembly translates almost 1-to-1 with its binary bytecode. There are several high level languages for programming that are far simpler than assembly, but assembly is still worth learning. Assembly allows you control of the CPU and its registers directly. This can be used to write very small and very fast processes. Another advantage of assembly is that what you write is usually exactly what you get in the binary format, where higher level languages such as C/C++ will usually add extra boilerplate code to set things up.
Finally, in the information security community we often need to use disassembly to analyze malware samples, exploit payloads, and perform general reverse engineering. A strong understanding of assembly will go a long way in making sense of this information. Working knowledge of Assembly is also needed if you want to make your own custom payloads, which can be both fun and rewarding!
Need a refresher on the X86 architecture first?
This tutorial assumes some baseline knowledge of X86. If registers and memory layout are still fuzzy, start with our walkthrough of the CPU architecture before diving into assembly.
Read: A Hacker's Tour of the X86 CPU ArchitecturePrerequisite Knowledge
Before continuing, this article will assume you have some basic knowledge of the X86 architecture. A blog post that covers the basics of the X86 architecture can be found on our blog listing page.
Getting Started - Toolchains & Source Code Syntax
There are several toolchains that can be used. For X86 the two default options are the GNU Assembler (GAS) or the Netwide Assembler (NASM). In this tutorial, we will focus on NASM to show a working example. It is worth noting that the syntax will NOT be compatible between these two compilers. The primary difference is in the operand ordering and referencing conventions between the compilers. GAS uses AT&T syntax and NASM uses Intel syntax. This results in differences in how the source code must be formatted so they aren't cross-compatible.
Making Syscalls on X86 Linux
Syscalls offer a method to invoke and use functionality in the operating system. Syscalls are launched on x86 Linux by invoking an interrupt instruction with the hex value of 0x80 (int 0x80). Before invoking this interrupt however, you need to set up everything for the syscall. It is worth noting the calling convention for syscalls are different on other architectures, this would even include x86_64 which uses the SYSCALL instruction instead of INT 0x80. This tutorial is focused on 32-bit x86.
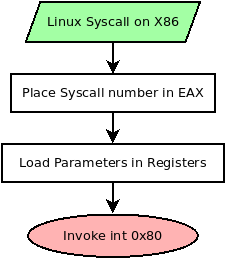
The first thing you need to do is specify the syscall number you are planning to invoke and place that value in EAX. Depending on the syscall you are launching, you also need to set up arguments for the syscall to use. These will also be loaded in registers in the following order.
| Parameter # | Register |
|---|---|
| Parameter 1 | EBX |
| Parameter 2 | ECX |
| Parameter 3 | EDX |
| Parameter 4 | ESI |
| Parameter 5 | EDI |
| Parameter 6 | EBP |
After the syscall number is set, and the registers are loaded with the parameters needed, then calling the instruction INT 0x80 will execute the syscall. If the syscall returns a value, it will be placed in EAX. For example, opening a file should return a file descriptor or error code in EAX.
How to Find Information on Syscalls
So earlier we mentioned that we need to load a syscall number into EAX for the syscall we want to invoke, but how do we know which numbers relate to the syscalls? There are several ways to obtain this information. Here are a few methods:
- Linux Kernel Headers: The most absolute source of truth, but also not the easiest method to get what you're looking for
- Web resources: https://syscalls.w3challs.com/ is an amazing resource for this. It has a table view of syscalls, the parameters it expects, and the register configuration. They have several architectures and OSes covered, including Linux 32-bit x86 syscalls.
Build a basic Hello World Program
The goal is to build a basic hello world program in x86 in Linux using just syscalls. For this we will need two syscalls, which are outlined in the table below:
| Syscall # | Syscall Name | Parameters | Reason |
|---|---|---|---|
| 4 | write | EBX => int fd |
This call allows us to write x number of bytes (count) to a file descriptor (fd) from the buffer (buf). We can use this to write to STDOUT which has the fd of 1. |
| 1 | exit | EBX => int status |
This syscall allows us to exit the program cleanly with the status code of our choice. In this case, we will exit with the status code of 0. |
If you look at the way these syscalls are set up and the parameters, they basically mirror the libc functions that match their names. These functions in libc are generally wrappers to these syscalls. As a result, the command man 2 <syscall> can usually help explain what the parameters are, what behavior to expect, and possible return values with these syscalls. For example, the following commands would pull up the manuals for these syscalls: man 2 write and man 2 exit.
For reference, the following C code gets us close to what we will be writing in x86 assembly.
#include <stdio.h>
#include <stdlib.h>
#include <string.h>
#include <unistd.h>

const char *msg = " [*] Hello World!\n";

int main() {
    // Write the message to STDOUT.
    write(1, msg, strlen(msg));

    // Exit with status code 0;
    exit(0);
}
Which we can compile, check the size, run, and use strace, which dumps a list of syscalls a program invokes, to see how it functions as shown in the following screenshot.
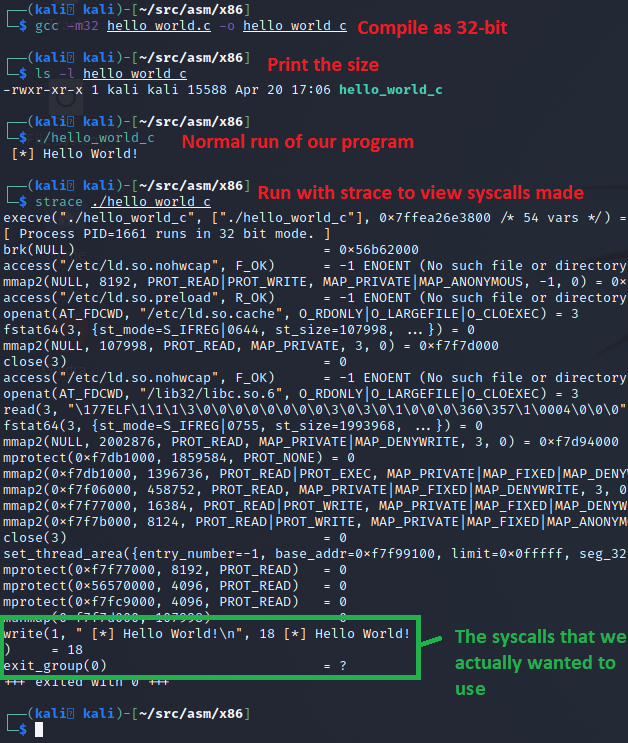
This basic Hello World in C came out to be ~15kb in size, which isn't bad for a program that hasn't had its debugging symbols stripped. However the strace shows a lot of extra syscalls that we didn't invoke directly. This is C boilerplate code that's run during the loading process before main() is invoked. Towards the end of all of this, we finally see our write syscall, and an exit_group syscall instead of an exit syscall. This is all here just for reference so we can compare it against what we build later in assembly.
Source Code
Time to write our assembly for NASM! Let's first list our complete code here for the hello_world_nasm.asm file, then we will pick it apart to explain what is going on. The complete code is as follows:
global _start     ; global is used to export the _start label.
                  ; This will be the entry point to the program.

   ; The data segment of our program.
section .data
   msg: db "Hello, World!",0xa ; Declare a label "msg" which has
                               ; our string we want to print.
                               ; for reference: 0xa = "\n"

   len: equ $-msg              ; "len" will calculate the current
                               ; offset minus the "msg" offset.
                               ; this should give us the size of
                               ; "msg".

   ; The .text segment of our program
section .text
_start:
   ;######################################
   ; syscall - write(1, msg, len);
   ;######################################
   mov eax, 4     ; 4 = Syscall number for Write()
   mov ebx, 1     ; File Descriptor to write to (STDOUT is 1)
   mov ecx, msg   ; String to write. A pointer to the variable 'msg'
   mov edx, len   ; The length of string to print
   int 0x80       ; Poke the kernel and tell it to run the write() call

   ;######################################
   ; syscall - exit(0);
   ;######################################
   mov al, 1      ; Syscall for Exit()
   mov ebx, 0     ; The status code we want to provide.
   int 0x80       ; Poke kernel. This will end the program
The code above might look massive, but it's mostly comments to help explain things. If we remove the comments, the code part would be much smaller and simply be:
global _start
section .data
   msg: db "Hello, World!",0xa
   len: equ $-msg
section .text
_start:
   mov eax, 4
   mov ebx, 1
   mov ecx, msg
   mov edx, len
   int 0x80
   mov al, 1
   mov ebx, 0
   int 0x80
In NASM, anything following a semicolon (;) is considered a comment. The top part of our file is just some basic information for humans that are looking at the file. The next line exports our _start label so the compiler will make it visible to the linker to use as an entry point. After this is the line that marks the start of our .data section of the ELF binary. You would state the keyword "section" followed by the name of the section. This .data section we will use to store our variables.
In the data section, we create two variables. The first one is "msg". The "msg:" part creates this as a label, which provides a means for us to access an offset with a friendly name. After declaring the label, we use the "db" keyword which means "declare bytes". This lets NASM know that what follows isn't instructions, but rather a collection of specified bytes. In our case we are providing the ASCII string "Hello, World!" and a newline byte (0xa).
The second variable "len" performs an offset calculation to determine the size by taking the label len offset and subtracting the msg label offset. This effectively gives us the size of the data between the two labels.
Now that those two variables are created, we end the .data section and start the .text section where we place the executable instruction code. We declare the _start label as the entry point, then set up our write syscall: load 4 into EAX (the write syscall number), 1 into EBX (STDOUT file descriptor), a pointer to msg into ECX, and the length into EDX. The INT 0x80 instruction tells the kernel to execute the syscall. For the exit syscall, we use MOV AL, 1 instead of MOV EAX, 1 because it produces a 2-byte instruction instead of 5 bytes.
Compiling and Linking
The comment block at the top of the code explains how to compile and link this code. It's pretty straightforward with the following two commands:
$ nasm -f elf hello_world_nasm.asm
$ ld -m elf_i386 hello_world_nasm.o -o hello_world_nasm
To make things even easier, we can add the following text to a Makefile and leverage the make command to build both the C and NASM projects for us.
all: hello_world_nasm hello_world_c

hello_world_nasm:
        nasm -f elf hello_world_nasm.asm
        ld -m elf_i386 hello_world_nasm.o -o hello_world_nasm

hello_world_c:
        gcc hello_world.c -o hello_world_c

clean:
        rm hello_world_c hello_world_nasm hello_world_nasm.o
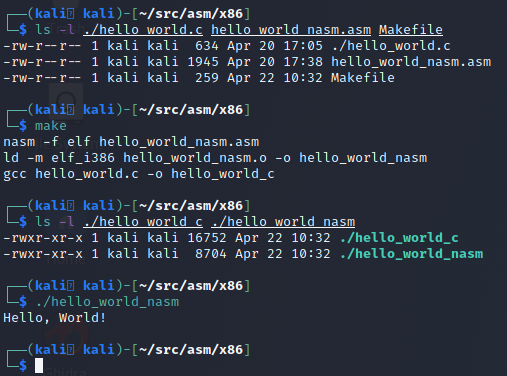
With that Makefile in place, you can build both the C and NASM version by simply running the make command in the directory as shown below:
Comparing the C and NASM Programs
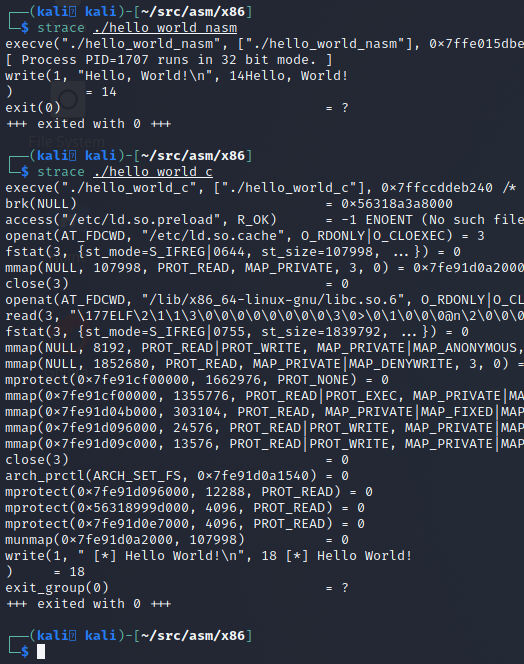
As shown in the last screenshot, our NASM program is about half the size as the C binary. What's more important is that the NASM binary is also lighter when run. It does exactly what we told it to do. If we run both of these side-by-side with strace to view the syscalls we can see the NASM binary is much more direct and to the point than its C counterpart.
Another difference is what the main and _start code blocks look like in our programs. What we wrote in assembly is almost EXACTLY what we get in the decompiler output, with the biggest difference being that the compiler and linker resolved the msg and len labels directly to what they needed to be. We can see this by using the objdump (short for Object Dump) command.
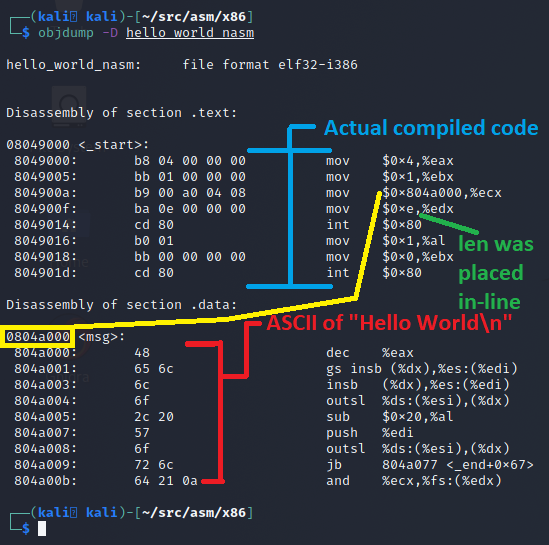
Looking at the objdump output, we can see that this is almost exactly what we wrote. The object dump is using a different syntax for display, that's closer to what GAS would use (the AT&T vs Intel syntax covered earlier in this blog). The table below shows the code we wrote versus the disassembled binary code for the _start code block.
| What we wrote | What it became once compiled |
|---|---|
mov eax, 4 |
mov $0x4,%eax |
We can run objdump on the C version and it has a lot more going on, but we will just compare our _start code in NASM vs the main() code of the C project:
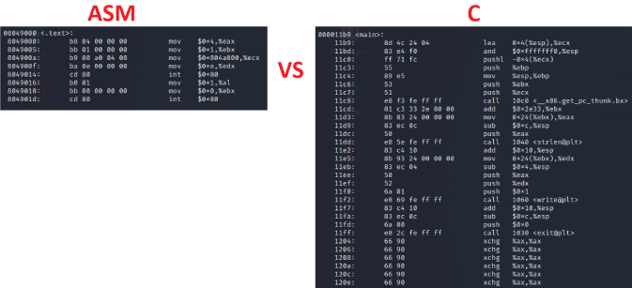
So we have to ask ourselves. If NASM produced leaner code and does exactly what we told it to do instruction wise, why even mess with C? Well several arguments for that:
- C is a higher level language: easier to learn than ASM, and the programmer has less responsibility over memory management. Stack frames are managed by the compiler as opposed to having to be manually set up. It's much easier to create memory corruption bugs in ASM than it is in C.
- This NASM code works ONLY on 32-bit X86 CPUs. This won't work on an ARM-based Raspberry Pi without an emulator. The C code example is more portable because GCC will compile it on other CPU architectures.
- ASM doesn't scale easily for large projects. While printing hello world was easy, imagine trying to build a mature DB engine or full-featured web server in ASM.
That said ASM can be very fast and small. Knowing ASM can help you write shellcode for custom payloads and assist in reverse engineering efforts. Even though decompilers are getting better, they still fall flat sometimes, and when they do, disassembly will be your source-of-truth, but only if you know how to read it.
Conclusion
I hope you've enjoyed this blog post and learned something new today about the x86 assembly. In future posts, we will look to repeat this hello world in GAS instead of NASM to cover both toolchains, and look into what we could do to optimize this code further and make it "shellcode safe" so it could be a viable payload for use in memory corruption exploit.
Custom payloads. Manual exploitation. Real results.
Our testers build custom tooling and write their own shellcode when the job calls for it. If you want a penetration test that goes deeper than an automated scan, reach out.
Reach OutLinux X86 Assembly Series Blog Post
Interested in more information about the X86 architecture and Linux shellcode/assembly? This blog is a part of a series and the full list of blogs in this series can be found below:
- A Hacker's Tour of the X86 CPU Architecture
- Linux X86 Assembly - How to Build a Hello World Program in NASM
- Linux X86 Assembly - How to Build a Hello World Program in GAS
- Linux X86 Assembly - How to Make Our Hello World Usable as an Exploit Payload
- Linux X86 Assembly - How To Make Payload Extraction Easier
- Linux X86 Assembly - How To Test Custom Shellcode Using a C Payload Tester