

Overview
In the last blog post of the X86 Linux assembly series, we focused on how to make our Hello World payload friendly for use as a payload in exploits. However, we didn't cover how to extract the payload itself for use in exploits. Sure you could view the Objdump output and copy each hex byte out by hand, but that would be tedious and time consuming. Today I want to cover a method for extracting our custom payload from an object file created with GAS using Objcopy.
In covering this method, we will showcase how to do this manually by hand, as well as via a script I wrote for automating the process of compiling and extracting the payload then printing it in a hex-encoded format that is compatible with C or Python code. This new script has been added to the Secure Ideas Professionally Evil x86_asm GitHub repository and can be found under the newly added utils folder.
The Method: GAS + Objcopy
Using these two tools makes it possible to build a binary object from the source code that isn't yet an executable (it still requires linking to work), but still has the respective sections. Since our entire payload was in the .text section of the binary, Objcopy can extract that entire section to its own file by itself, and that would be a binary file containing just our payload.
Using GAS to Make an Object File
In our previous example we were using the Makefile to build our project, but the code files also contained comments that explained how to compile and link the code to produce a working standalone ELF binary. The part we are interested in here is the compile part. We can skip the linking part. We just need GAS to compile our code into its binary equivalent, which is what it does when it compiles it into an object file. Consider the comment on compiling found in our hello_world_gas_solution_3.s source code file:
as --march=i386 --32 ./hello_world_gas_solution_3.s -o hello_world_gas_solution_3.o
This invokes the as command to compile the source code file into the object file hello_world_gas_solution_3.o. Even as an object file this still shows up as an ELF file.

Since it still shows up as an ELF, even though it won't run as is, objdump will still show that our binary code is present if we run objdump -d ./hello_world_gas_solution_3.o as shown below.
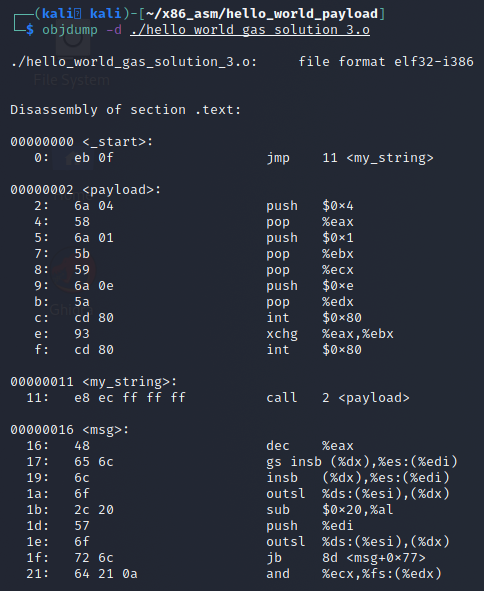
The output from the Objdump command shows that this is the .text section of the object file and that's really all we need to move forward to carve out our payload with Objcopy.
Extracting the Raw Binary of .text with Objcopy
Now that we have the object file, we will use Objcopy to carve the .text section out of the file and place it into another file as raw binary. This would get rid of all the information outside of the section, such as ELF headers and other sections that we don't need.
Reviewing the man page on Objcopy, the -j switch allows us to target a section for extraction. It takes a parameter of a search pattern to match against the sections, which means we can provide it with .text and it should extract just that section.

Next, we need to specify the output format. We want raw binary. If we run Objcopy without specifying this, we end up with a second ELF file.
The -O switch allows us to specify the output format. The supported values depend on your build of Objcopy. Running objcopy --help shows the list at the bottom of the help screen, where we can see binary is supported.


Now that we have the switches we can make a command that will perform the extraction we are after:
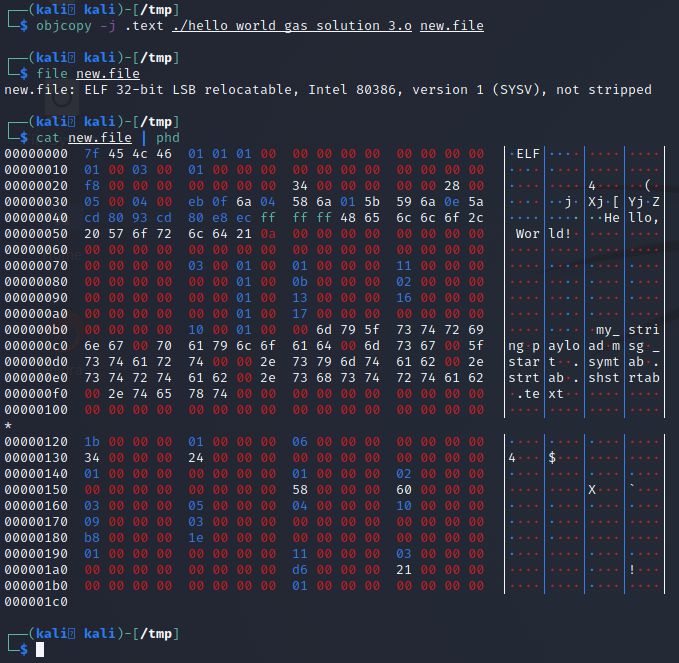
objcopy -j .text -O binary ./hello_world_gas_solution_3.o new1.file
The following screenshot shows this in action, a dump of the file and a disassembly of the original object so you can compare bytes and confirm it's exactly our payload.

Using the Raw Binary File for Payload Use
With the use of GAS to make an object file and Objcopy to carve the payload out of the object file, we now have a raw binary file that contains our payload by itself. This unfortunately isn't copy-and-paste friendly, but is easy enough to use in Python or C. Simply open the file for binary read and copy it to your buffer and use it. However we can do better than this, and we should!
Building a Script To Automatically Build & Extract Payloads from Source
If we think about what we've done up to this point, it's a logical step-by-step process. That's perfect for automation! With a little time and effort we can produce a Python script that automates this process of compiling and extracting the payload. On top of that, we can also have it format the payload so it's hex-encoded and nicely formatted for use in C or Python code, or just dump it out as a raw hex-encoded string.
Furthermore, we can also have it perform some sanity checks on the payload and alert us to possible limitations, such as signed chars, carriage returns, space, line feeds, or null bytes that are often restrictions in several use cases.
Due to the size of this script, it will not be pasted here. However this script has been built and uploaded to the Secure Ideas Professionally Evil x86_asm GitHub repository. It can be found in the newly created utils folder as build_and_extract_x86_payload.py.
Using the Script
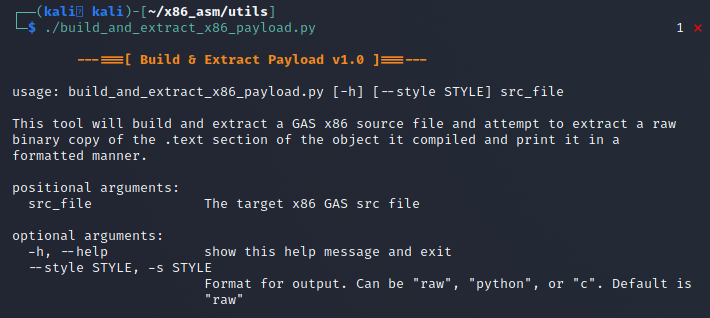
This script has a help menu that can be brought up by providing no arguments or the --help flag.
In its most basic usage:
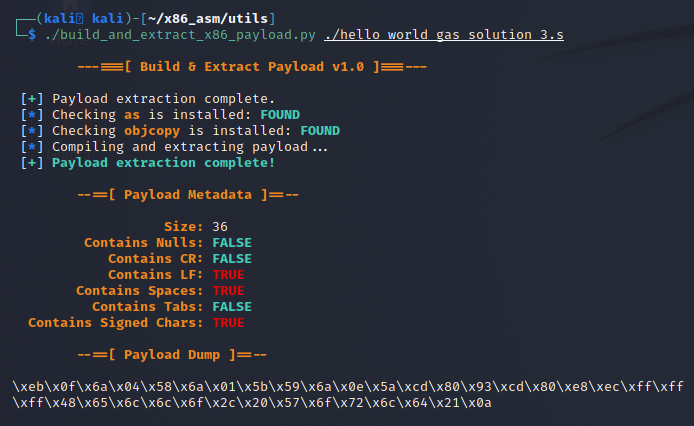
./build_and_extract_x86_payload.py [GAS_src_file]
Using it this way will perform the compiling and extraction of the payload, collect and print stats about the payload, then print the hex-encoded payload using the default style of raw. The screenshot below shows what this would produce.
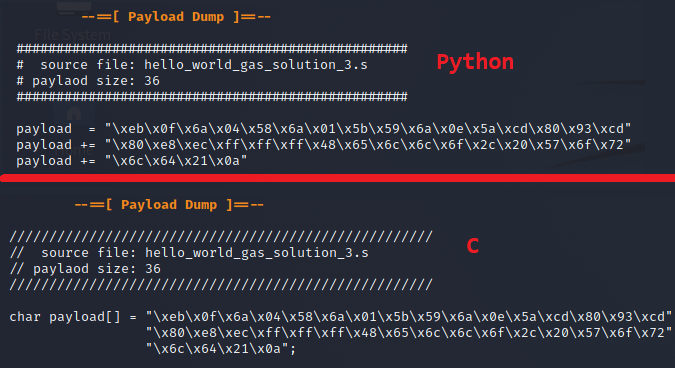
There is also support for styling via the -s or --style parameter which will modify the formatting of the payload dump. Currently the script supports C or Python formatting. The results of each are shown below.
Conclusion
I hope you've enjoyed this blog post and learned something new today about extracting your shellcode and find the new tool useful. The code for this post will be added to the Secure Ideas Professionally Evil x86_asm GitHub repository. In future posts, we will cover how to build a C shellcode tester stub and use it to test our shellcode standalone.
If you're interested in security fundamentals, we have a Professionally Evil Fundamentals (PEF) channel that covers a variety of technology topics. We also answer general basic questions in our Knowledge Center.
Linux X86 Assembly Series Blog Post
Interested in more information about the X86 architecture and Linux shellcode/assembly? This blog is a part of a series and the full list of blogs in this series can be found below:
- A Hacker's Tour of the X86 CPU Architecture
- Linux X86 Assembly - How to Build a Hello World Program in NASM
- Linux X86 Assembly - How to Build a Hello World Program in GAS
- Linux X86 Assembly - How to Make Our Hello World Usable as an Exploit Payload
- Linux X86 Assembly - How To Make Payload Extraction Easier
- Linux X86 Assembly - How To Test Custom Shellcode Using a C Payload Tester
Custom payloads. Manual exploitation. Real results.
Our testers build custom tooling and write their own shellcode when the job calls for it. If you want a penetration test that goes deeper than an automated scan, reach out.
Reach Out