Overview
In the last two tutorials, we built a Hello World program in NASM and GAS for x86 assembly. While this can help us learn x86 assembly, it isn’t viable as a payload for use in exploits in its current form. Today’s blog will look into what those issues are, how they impact the code’s use as a payload, and what we can do to address those issues. If you’d like to follow along, the code for this blog post can be found on the Secure Ideas Professionally Evil x86_asm GitHub repository.
Overview of Our Current GAS Hello World Binary
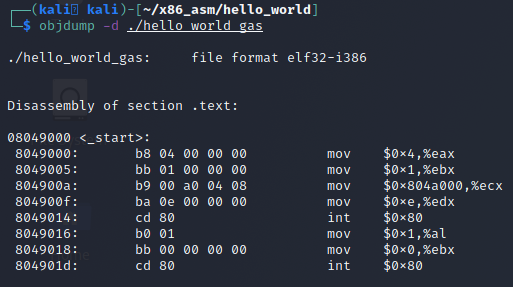
In our previous example, we built an ELF binary from our GAS code. We can see where we are currently at by using the tool objdump with the -d switch to dump the disassembly of the binaries code .text section of the binary as shown in the screenshot below.
The Problems We Need to Solve – High Level
On the surface, it appears fine, but to use this as a payload in an exploit, there are a few issues that need to be addressed. The high level overview of our issues we will want to address is outlined below:
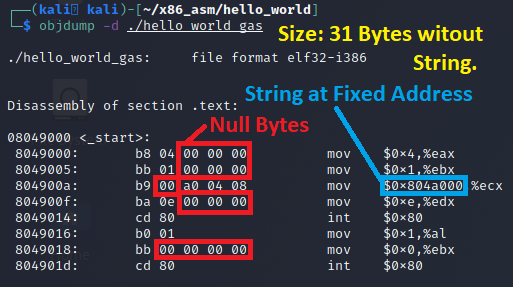
- The Hello World string is at a fixed address in the binary
- In an exploit, we need this to be dynamic since we don’t know where the payload might end up in a memory corruption exploit.
- The code contains several null bytes (0x00)
- In some exploits, this might be alright, such as a buffer overflow using read().
- But this will fail in string based functions such as strcpy(), sprintf(), etc as the null byte is a string terminator and its presence is treated as a delimiter that means that byte is the end of the string.
- Size
- Size is sometimes a constraint, it’s probably fine as is
- But why not see if we can make this smaller while we are in here
- Smaller is usually never a problem, larger is more likely to cause issues
Problem 1 – Fixed Address to the Hello World String
The first issue that is a deal breaker for using this as an exploit payload is the fact that our code DEPENDS on the Hello World string being hard coded at address 0x804a000. This is simply not likely to be the case in a memory corruption exploit. Looking at the objdump output, our code is currently 31 bytes and doesn’t contain our string at all. This issue needs to be addressed so we can include the Hello World string in our payload and have it’s address determined relative to its location in memory.
Solution 1 – Jumps & Calls for Address Retrieval
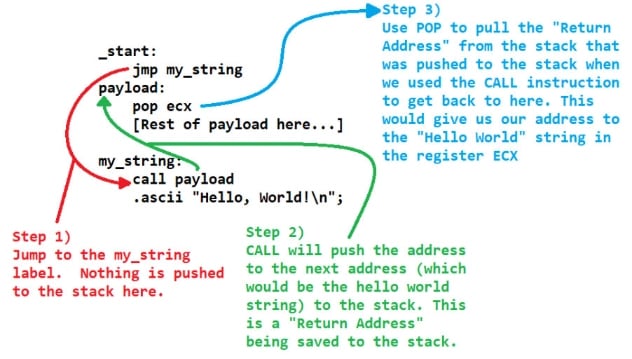
There are a few ways we can address this, but one of the easiest methods would be to use the jmp/call/pop method. This method uses those three instructions to accomplish the goal of finding the address of the string relative to where it is in regard to the payload. First let’s cover the difference between a JMP and CALL instruction.
To keep this high level, a JMP will move the EIP/RIP pointer to an address. This address can be either absolute or relative depending on how far the distance is from its current location. In our case, we can use a relative jump since our payload is fairly small. On the other hand, the CALL instruction can be absolute or relative as well, once again depending on the distance from its current position. However, CALL will push the address of the next instruction after it, as an absolute address, to the stack. This is known as a return address. It’s also worth noting that if the CALL is relative to a previous address, there will be no null bytes as the offset would be a signed negative number.
CALL instructions are intended to be used for function calls. That is you’d use it to CALL a function. This is why it pushes a return address to the stack. The function you call should invoke a RET instruction, which is shorthand for return, which will take the address off the top of the stack and set the EIP/RIP instruction pointer register to that address. This is a convention, a “gentlemen’s agreement” of how this works. But we can use this to find the absolute address to the location after the CALL instruction.
JMP on the other hand will just move the EIP/RIP instruction pointer register to the new location, without pushing an address to the stack. Jump instructions are generally used for control flow branching, such as if/then/else branches. We can groom our payload to leverage the behavior of CALL pushing a return address to the stack, and just POP it into a register for our own use. The flow for this is demonstrated in the image below.
Implementing Solution 1 in Our Code
To get this implemented, we can create a new source code file called hello_world_gas_solution_1.s. We can copy our original hello_world_gas.s as a starting point. Once that is copied to the new file we will need to make a few changes. The high level overview of the changes we need to do are:
- Move the msg string to the end of our payload in the .text section
- We can also move the len variable with it
- We no longer need the .data section, and can remove it
- Add a label before msg that we can JMP to
- We will call the new label my_string
- Add a JMP at the start of our payload to jump to the my_string label
- Create a new label after the JMP instruction for us to CALL back to
- We will call that label payload
- Add a CALL instruction back to the payload label under the my_string label
- Update our comments
The code that implements all of the changes outlined in the bulletpoints is listed below.
##########################################################################
#
# Program: hello_world_gas_solution_1
#
# Date: 04/22/2021
#
# Author: Travis Phillips
#
# Purpose: An updated hello world program in x86 assembly for GAS that
#          fixes the program so that the hello world string is no longer
#          at a fixed address
#
# Compile: as --march=i386 --32 ./hello_world_gas_solution_1.s -o hello_world_gas_solution_1.o
#    Link: ld -m elf_i386 hello_world_gas_solution_1.o -o hello_world_gas_solution_1
#
##########################################################################
.global  _start                 # we must export the entry point to the
                                # ELF linker or loader. Conventionally,
                                # they recognize _start as their entry
                                # point but this can be overridden with
                                # ld -e "label_name" when linking.

.text                           # .text section declaration

_start:
    jmp my_string               # Jump to the my_string label.
payload:
    ######################################
    # syscall - write(1, msg, len);
    ######################################
    mov    $4,%eax              # 4 = Syscall number for Write()

    mov    $1,%ebx              # File Descriptor to write to
                                # In this case: STDOUT is 1

    pop    %ecx                 # Pop the string address pointer
                                # off the stack into ecx.

    mov    $len,%edx            # The length of string to print
                                # which is 14 characters

    int    $0x80                # Poke the kernel and tell it to run the
                                # write() call we set up

    ######################################
    # syscall - exit(0);
    ######################################
    mov    $1,%al               # 1 = Syscall for Exit()
    mov    $0,%ebx              # The status code we want to provide.
    int    $0x80                # Poke kernel. This will end the program.

my_string:
    call   payload              # Call the payload label. This will
                                # push the pointer to msg onto the stack
                                # as a return address.

msg:
    .ascii "Hello, World!\n"    # Declare a label "msg" which has
                                # our string we want to print.

    len = . - msg               # "len" will calculate the current
                                # offset minus the "msg" offset.
                                # this should give us the size of
                                # "msg".
Once this is in the file, we can compile it and dump it with objdump again and we can see that we now have a program that doesn’t make use of the fixed address for the Hello World string!
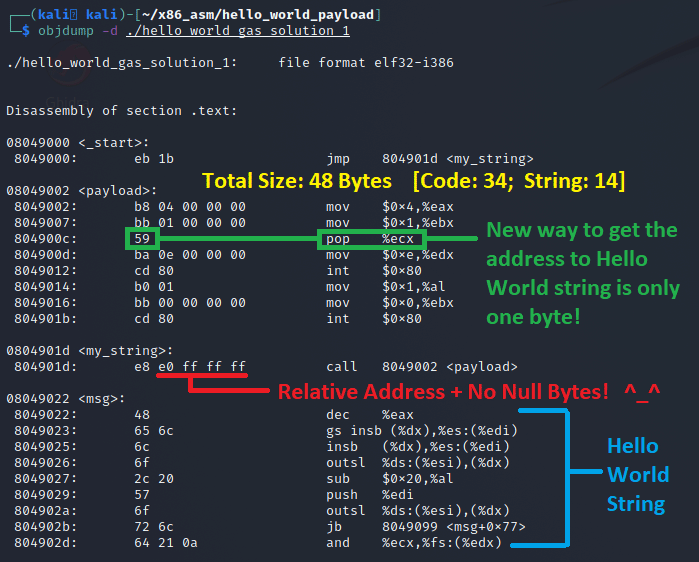
As you can see, JMP instruction jumps 0x1b bytes, which is 27 in decimal and objdump already shows in the disassembly that it lands on the my_string label. The CALL instruction back to the payload label is using a relative offset to jump to, which is 0xffffffe0. When viewed as a signed integer in decimal, this would be -32. In later instructions, we invoke the POP ECX instruction to get the address to the Hello World string that was saved as a return address on the stack by the CALL instruction.
Finally, these changes are neat, but we will want to give it a test run to make sure that it works by running the compiled binary.

Problem 2 – Null Bytes in the Shellcode
So far we made the string so it’s location is dynamically found relative to the payload. However if we attempted to exploit a string family function such as strcpy() or sprintf(), nulls aren’t allowed in our payload except at the very end of the payload, and only one of them would be allowed. If we look at the objdump output from our hello_world_gas_solution_1 binary, we can see that we still have null bytes in the middle of our payload code.

This occurs because we are trying to move a value into the 32-bit register and the compiler will treat it as a 32-bit value. So what we are seeing is the move to whatever register instruction, followed by a 32-bit integer value in little endian format. This means for an 8-bit value like we are using, that the rest of the 32-bit space would need to be padded with zero bits, and hence the cause of our null byte problem.
Solution 2 – XOR Registers, Use 8 bit Registers Moves or Push/Pull Bytes
As mentioned in the earlier A Hacker’s Tour of the X86 CPU Architecture blog post, x86 supports 8 bit register addresses. So instead of moving a value into EAX, we could move it to AL instead. This is simple to implement by simply replacing EAX with AL. However, in terms of memory corrupt bug exploits, we also have to assume that the registers will already be populated with data, likely 32-bit values such as address pointers. If we move a value into AL, it will ONLY overwrite the last byte of EAX and leave the rest unchanged. This can actually be useful in some cases, but for setting it to a 8-bit number, not so much. Consider the following code snippet and comments below:
_start:                      # EAX current: 0x00000000

    # Let’s set EAX to a 32 bit value
    mov    $0xdeadbeef, %eax # EAX current: 0xdeadbeef

    # Now let’s move the syscall for write
    # into AL
    mov    $4, %al           # EAX current: 0xdeadbe04

    # EAX is now 0xdeadbe04. If you try to execute
    # this as a syscall, it will fail.
The code snippet above shows that if you move the syscall for write (4) into AL when EAX already contains a 32-bit value, it will fail. As a result, we first need to assume those registers contain that sort of data, and address that by zeroing out the registers to be used at the start of our code. Moving zero into the register would create nulls, so that’s off the table. Instead, the easiest way to zero out a register is to use the XOR instruction, and XOR the register against itself.
XOR means exclusive or and requires a true and a false to return true. If a true and true occurs, then false is returned. If a false and a false occurs, it will return false. Therefore, a value XOR against itself will return all zeros! If the XOR bitwise operation is still confusing, we have a previous blog post titled Boolean Math (XOR Logic) – CISSP Domain 3 that covers this topic in depth.
So let’s attempt to implement that solution in our code by copying hello_world_gas_solution_1.s to hello_world_gas_solution_2.s. This file will already include our first solution and we can address our null byte problem while keeping the first solution.
Implementing Solution 2 in Our Code
To get this implemented, we can create a new source code file called hello_world_gas_solution_2.s. We can copy our original hello_world_gas_solution_1.s as a starting point. Once that is copied to the new file we will need to make a few changes. The high level overview of the changes we need to do are:
- At the start of the payload label, add code to XOR the following registers against themselves:
- EAX
- EBX
- EDX
- ECX doesn’t need XOR since the POP instruction will pull a 32-bit address value from the stack.
- Modify the MOV instructions so that they move the 8-bit values into the 8-bit registers instead of the 32-bit registers:
- EAX => AL
- EBX => BL
- EDX => DL
- At the exit syscall we zero out EBX
- Instead of MOV zero, we will use XOR instead.
- Update our comments.
The code that implements all of the changes outlined in the bulletpoints is listed below.
##########################################################################
#
# Program: hello_world_gas_solution_2
#
# Date: 04/22/2021
#
# Author: Travis Phillips
#
# Purpose: An updated hello world program in x86 assembly for GAS that
#          implements solution 1 to make the string address dynamic, but
#          also fixes the null byte issues.
#
# Compile: as --march=i386 --32 ./hello_world_gas_solution_2.s -o hello_world_gas_solution_2.o
#    Link: ld -m elf_i386 hello_world_gas_solution_2.o -o hello_world_gas_solution_2
#
##########################################################################
.global  _start                 # we must export the entry point to the
                                # ELF linker or loader. Conventionally,
                                # they recognize _start as their entry
                                # point but this can be overridden with
                                # ld -e "label_name" when linking.

.text                           # .text section declaration

_start:
    jmp my_string               # Jump to the my_string label.
payload:
    ######################################
    # syscall - write(1, msg, len);
    ######################################
    xor    %eax,%eax            # Zero out eax.
    xor    %ebx,%ebx            # Zero out ebx.
    xor    %edx,%edx            # Zero out edx.
    mov    $4,%al               # 4 = Syscall number for Write()

    mov    $1,%bl               # File Descriptor to write to
                                # In this case: STDOUT is 1

    pop    %ecx                 # Pop the string address pointer
                                # off the stack into ecx.

    mov    $len,%dl             # The length of string to print
                                # which is 14 characters

    int    $0x80                # Poke the kernel and tell it to run the
                                # write() call we set up

    ######################################
    # syscall - exit(0);
    ######################################
    # Note: If your message was more than
    # 255 characters, you will need to
    # either zero out eax again via xor,
    # or mov %ebx,%eax.
    ######################################
    mov    $1,%al               # 1 = Syscall for Exit()
    xor    %ebx,%ebx            # The status code we want to provide.
    int    $0x80                # Poke kernel. This will end the program.

my_string:
    call   payload              # Call to the payload label. This will
                                # push the pointer to msg onto the stack
                                # as a return address.

msg:
    .ascii    "Hello, World!\n" # Declare a label "msg" which has
                                # our string we want to print.

    len = . - msg               # "len" will calculate the current
                                # offset minus the "msg" offset.
                                # this should give us the size of
                                # "msg".
Once this is in the file, we can compile it and dump it with objdump once again and we can see that we now have a program that not only doesn’t make use of the fixed address for the Hello World string, but is free of null bytes!
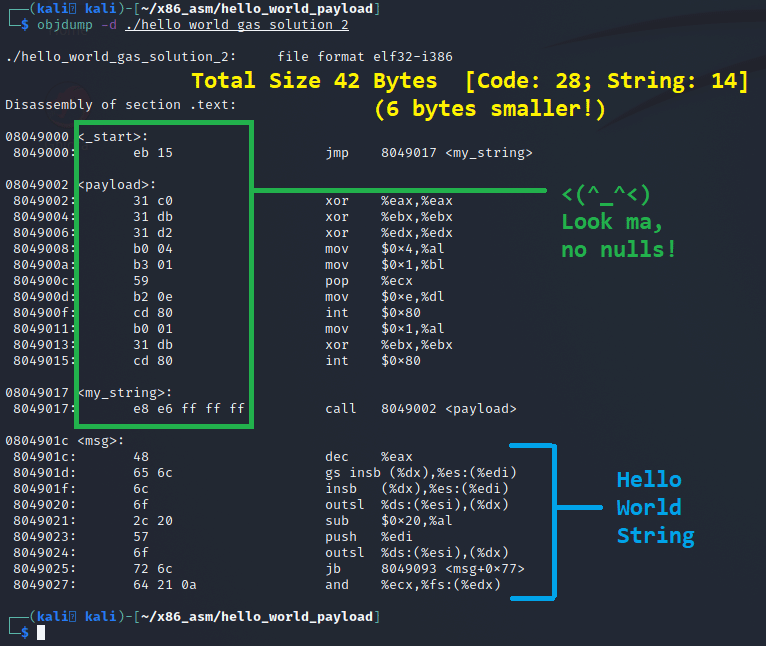
The objdump output confirms the new binary is free of null bytes. Not only is it free of null bytes, but while adding 3 new instructions, we still made the payload 6 bytes smaller!
Finally, we will also, like the last time, want to confirm that this payload works by running the compiled binary.

Problem 3 – Size Reduction
We already reduced the size by 6 bytes, but why stop there? Let’s see if we can reduce the size further, because why not…
Solution 3 – Play Around with Instruction Optimization
So there are a few things we can do to optimize our payload for size. First let’s think about how we are setting our registers using a XOR/MOV instruction. If we look at this for just setting EAX, we need 4 bytes as shown below from the objdump output related to that function of solution 2.
…
 8049002:       31 c0                   xor    %eax,%eax
…
 8049008:       b0 04                   mov    $0x4,%al
…
But in that same output, we can see that POP ECX only required one byte.
804900c: 59 pop %ecxIn x86, it is possible to push a single byte as well to the stack. This will actually push a 32-bit value to the stack, since a pop could possibly want to pop a 32-bit value. But doing this will result in a two byte instruction if we tested this out and dumped it. Below is an example of such an instruction pushing 0x04 to the stack.
8049002: 6a 04 push $0x4If you take that into consideration, then we could use a PUSH/POP for setting a register for three bytes as opposed to four bytes to use an XOR/MOV instruction set to set a register! Since we need to do this 3 times to set up the write() syscall, this would shave off three bytes.
Next let’s look at the setup of the exit() syscall.
 8049011:       b0 01                   mov    $0x1,%al
 8049013:       31 db                   xor    %ebx,%ebx
Currently it is four bytes in length to accomplish an exit(0) syscall. We could reduce this down to three bytes if we use a MOV instruction to move EBX (which contains 1 for STDOUT on the write() syscall) to EAX, then use DEC (decrement) on EBX to make it zero. The MOV instruction would be two bytes, and DEC is a single byte for a grand total of three bytes.
 804900e:       89 d8                   mov    %ebx,%eax
 8049010:       4b                      dec    %ebx
However, if we are willing to accept a different exit status, say exit(bytes_written) instead, we can just swap EAX (which contains the number of bytes written from the write() syscall) and EBX (1 – STDOUT from the write syscall). This is accomplished by using the XCHG (exchange) instruction which will swap the value of two registers. The best part of the XCHG instruction is this will be only one byte!
804900e: 93 xchg %eax,%ebxThis XCHG instruction method would allow us to shave another 3 bytes off the exit() syscall setup and give us a grand total of 6 bytes off our payload compared to solution 2!
Final Code
The final code that implements these size optimizations is as follows:
##########################################################################
#
# Program: hello_world_gas_solution_3
#
# Date: 05/28/2021
#
# Author: Travis Phillips
#
# Purpose: An updated hello world program safe for shellcode that is
#          reduced in size compared to previous versions.
#
# Compile: as --march=i386 --32 ./hello_world_gas_solution_3.s -o hello_world_gas_solution_3.o
#    Link: ld -m elf_i386 hello_world_gas_solution_3.o -o hello_world_gas_solution_3
#
##########################################################################
.global  _start                 # we must export the entry point to the
                                # ELF linker or loader. Conventionally,
                                # they recognize _start as their entry
                                # point but this can be overridden with
                                # ld -e "label_name" when linking.

.text                           # .text section declaration

_start:
    jmp my_string               # Jump to the my_string label.
payload:
    ######################################
    # syscall - write(1, msg, 14);
    ######################################
    push   $4
    pop    %eax                 # 4 = Syscall number for Write()

    push   $1                   # Push 1 to the stack.
    pop    %ebx                 # File Descriptor to write to
                                # In this case: STDOUT is 1

    pop    %ecx                 # Pop the string address pointer
                                # off the stack into ecx.

    push   $0x0e                # Push the length directly.
    pop    %edx                 # pop it into edx.

    int    $0x80                # Poke the kernel and tell it to run the
                                # write() call we set up

    ######################################
    # syscall - exit(bytes_printed);
    ######################################
    # exchange eax and ebx registers. This
    # instruction is only one byte!
    #
    # ebx currently has 1 for STDOUT. This
    # is also the syscall for exit().
    #
    # eax has the number of bytes written!
    # This will invoke exit with a status
    # code of the number of bytes written!
    ######################################
    xchg    %ebx,%eax           # Swap eax and ebx
    int     $0x80               # Poke kernel. This will end the program.

my_string:
    call   payload              # Call to the payload label. This will
                                # push the pointer to msg onto the stack
                                # as a return address.

msg:
    .ascii    "Hello, World!\n" # Declare a label "msg" which has
                                # our string we want to print.
When we compile it and run it through objdump, we will get the following output:
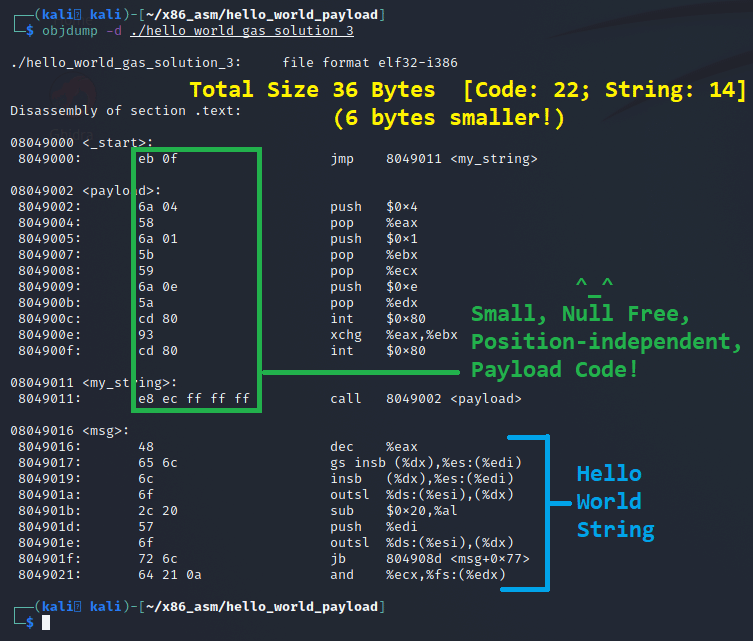
Finally, if we test it we can see our new exit strategy using the XCHG instruction will produce 14, which is the number of bytes that the write() syscall wrote to STDOUT.

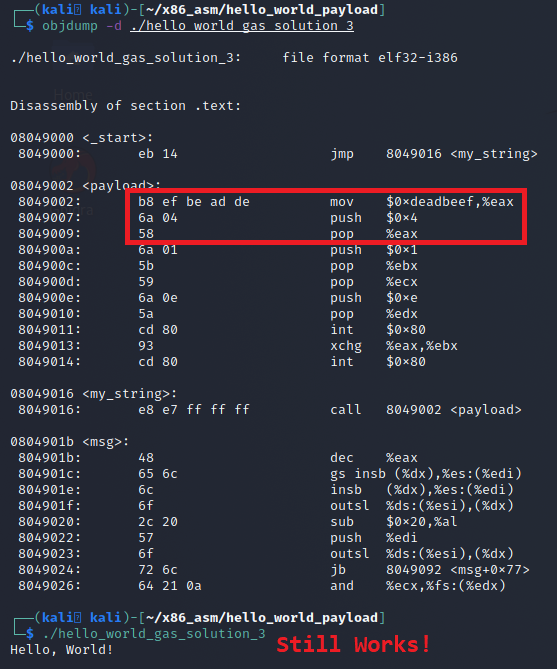
This code using the single byte PUSH/POP will work even in a memory corruption exploit where the registers are already filled with data. Below is a screenshot where the same code was run, but modified with an instruction at the beginning to populate EAX with the value 0xdeadbeef. The result was it worked just fine!
Conclusion
I hope you’ve enjoyed this blog post and learned something new today about making your code shellcode friendly. The code for this post and Makefile will be added to the Secure Ideas Professionally Evil x86_asm GitHub repository. In future posts, we will:
- Explain how to use various tools and scripts to extract our shellcode
- How to build a C shellcode tester stub and use it to test our shellcode standalone
Ready for a challenge? We post Mystery Challenges on Facebook, Linkedin, and Twitter. If you’re interested in security fundamentals, we have a Professionally Evil Fundamentals (PEF) channel that covers a variety of technology topics. We also answer general basic questions in our Knowledge Center. Finally, if you’re looking for a penetration test, professional training for your organization, or just have general security questions please Contact Us.
Linux X86 Assembly Series Blog Post
Interested in more information about the X86 architecture and Linux shellcode/assembly? This blog is a part of a series and the full list of blogs in this series can be found below:
-
- A Hacker's Tour of the X86 CPU Architecture
- Linux X86 Assembly – How to Build a Hello World Program in NASM
- Linux X86 Assembly – How to Build a Hello World Program in GAS
- Linux X86 Assembly – How to Make Our Hello World Usable as an Exploit Payload
- Linux X86 Assembly – How To Make Payload Extraction Easier
- Linux X86 Assembly – How To Test Custom Shellcode Using a C Payload Tester
